Some of us are experts in code development and others in systems that surround us. Thus one person knows how to code and the other one how to make the code live. But, what if someone asks you to do both? Will you know how to deploy what you have crafted?
We work in companies where responsibilities are divided between different groups of people. In the end, it is not possible to know everything. We have people specialized in quality assurance, frontend development, backend development, system engineers, and a few more. Well, there's nothing wrong with that. Specialization is good. The team built up of these different roles can work very effectively and very fast. But I'm pretty sure many of us work in a completely different environment, an environment where you have to be a versatile person. Some may argue, but I dare to say that both ways are good. As it is with any other thing in the IT world. The truth lies somewhere in between, and it just depends on what you need and what you can afford. Even if you are a specialist, sometimes it's good to know just a bit about the world around you. And that's what the article is about. I will show you the various aspects of launching your website.
The assumptions
Let's assume we have just finished building our website. So how do we make it publicly available? When we start digging, we may be overwhelmed. What is DNS and CNAME records? What is SSL, and why do we need it? Where do we host our site? What are apex and TTL? And a couple more terms to understand.
There are zillions of different possible options for us to launch our website. Depending on whether it's a static website or a dynamic one, depending on the kind of technology we have used to build it. Whether we want to host it on-prem or in the cloud. But in most of the cases, there are some common steps to make.
For the sake of this article, let's assume the following.
- We have an API that will serve some dynamic data
- We have a dynamically generated website that will consume the API data
- We have just bought a new domain for the website in our example mydomain.xy
- We will host the website with the help of AWS services
Creating services
We need two AWS EC2 instances, one for the API and one for the website. This article intends to show the key aspects of launching our websites, not necessarily setting it all up from scratch. Hence, I won't describe in details how we can create such services. I have used Elastic beanstalk. After I completed setting up my instances using Elastic Beanstalk, they became publicly available under the following domains:
- mydomain-api.eu-central-1.elasticbeanstalk.com
- mydomain-cms.eu-central-1.elasticbeanstalk.com
Well, maybe you are not aware of that but, our site is live now. However, as I mentioned, we also bought a domain for it, and we don't want users to visit our site via *.elasticbeanstalk.com. We want them to use mydomain.xy. That's a simple task, we just need a DNS CNAME record for our new domain pointing to mydomain-cms.eu-central-1.elasticbeanstalk.com.
DNS and all the magic
So what are DNS and CNAME? In short, when our browser requests something like www.mydomain.xy, the DNS server and the DNS records in our DNS table are responsible for translating the domain name to the IP address, and the IP address is what we need in the WWW world to reach a proper server/resources. CNAME is just one of many DNS record types. The CNAME record allows us to map one domain name to another.
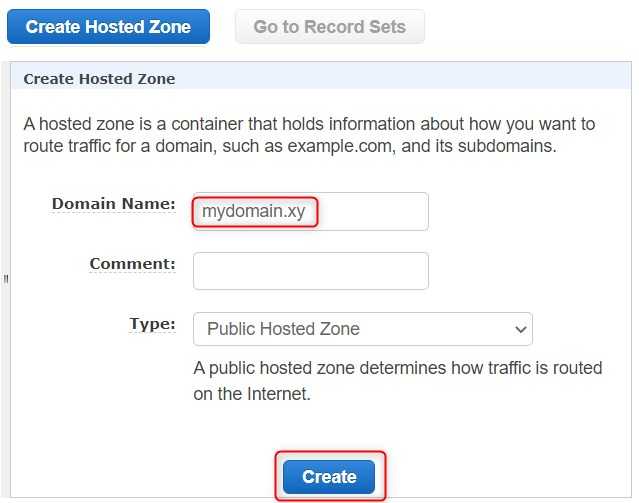
I've decided to manage my domain via Route53, which is the AWS DNS service. The first thing we have to do is to create a hosted zone in Routue53 under DNS Management.
Creating hosted zone in Route53
The zone name has to be the same as our domain name, which in our case is mydomain.xy.
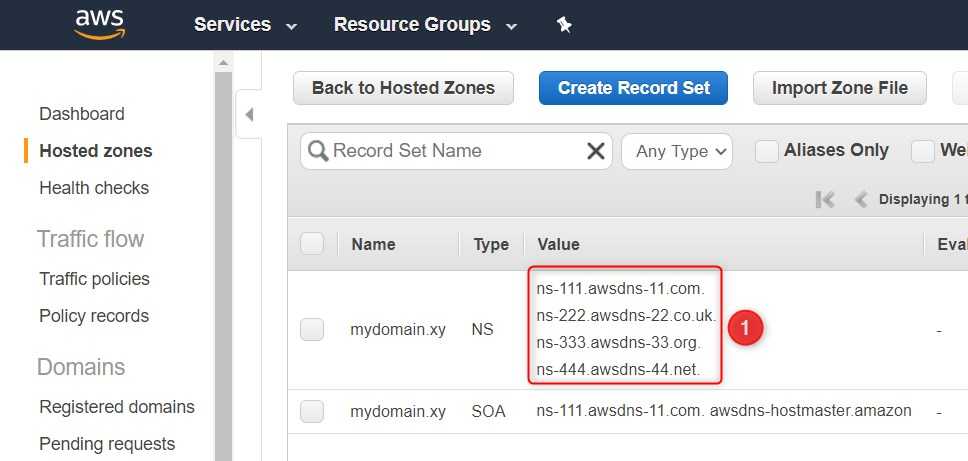
When we create a hosted zone, Route 53 will automatically create two records for us: NS and SOA.
Parking our domain in Route53
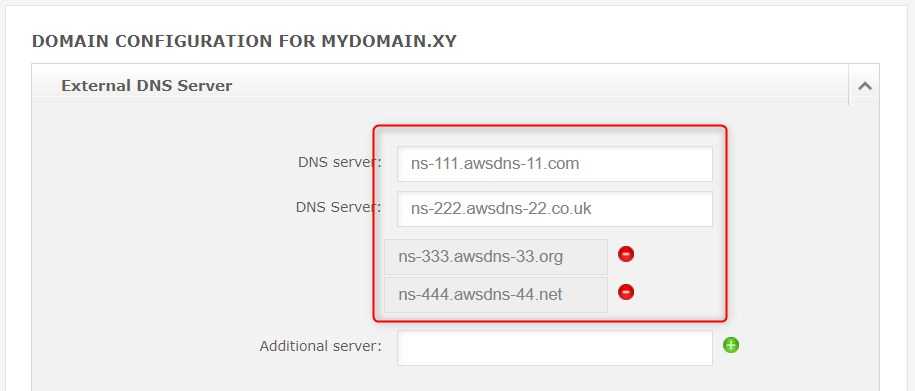
There are hundreds of domain selling services. It doesn't matter where we bought our domain, we should be able to re-configure it and make AWS Route53 our DNS service for it. In order to do that we have to add the four entries from the NS record (1) in the configuration of our domain registrar. Note, all the values in the record, as well as the hosted zone name, have the 'dot' at the very end. It's not a mistake, but the 'dot' is not that important. Some domain registrars may not allow using the ending 'dot'. Fear not, just skip the 'dot'. Here is an example configuration in my domain provider.
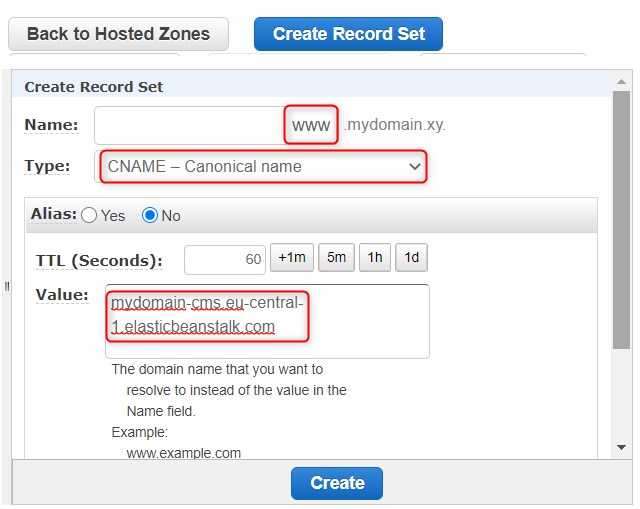
Creating a CNAME record
Let's create a Record Set of type CNAME and value www.mydomain.xy. What does a CNAME (Canonical Name) record do? This type of record maps one domain name to another. Which means if someone requests for www.mydomain.xy it's mydomain-cms.eu-central-1.elasticbeanstalk.com which serves the content.
That's awesome, but we definitely want our visitors to be able to request our site under mydomain.xy not only www.mydomain.xy. Well, why don't we just create another CNAME record? Unfortunately, it's not that simple. Why? As per RFC1912 section 2.4
A CNAME record is not allowed to coexist with any other data. In other words, if suzy.podunk.xx is an alias for sue.podunk.xx, you can't also have an MX record for suzy.podunk.edu, or an A record, or even a TXT record.
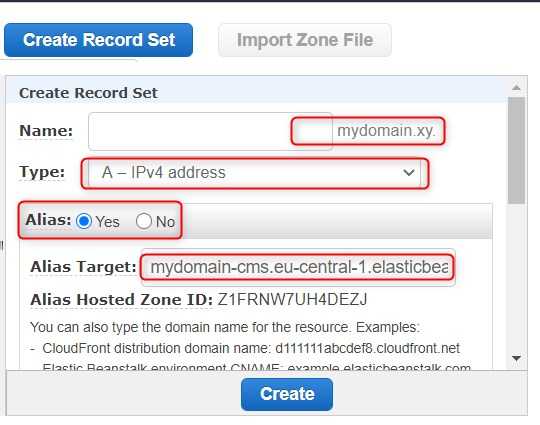
If we manage all our services in AWS, it's not a problem. We can create an aliast record of type A instead.
And here we have it. Our website is available under both www.mydomain.xy and mydomain.xy. Alias records are AWS specific solution and not all DNS providers give us such an option. For alternatives, you can read an interesting article: CNAME at the apex of a zone.
Unfortunately, there are still a couple of issues with such configuration that one may not be aware of. Look at the image below. On the left we requested mydomain.xy and on the right www.mydomain.xy
What are the issues?
- The website is not secured, and that's bad - just google for "why should I use https" or "why should I use SSL" (basically https is http-over-ssl). Someone has already explained it better than I would, and that's a topic for a long, long blog post.
- Although we can see in the browser's URL field that the site we are visiting is mydomain.xy (without www), actually mydomain.xy and www.mydomain.xy are two separate websites. Just to give us a better idea, we can treat it as google.com and maps.google.com. These are two completely different things. We could leave it as is, but we might encounter issues with cookies as well as duplicate content, and we don't want to mess with search bots, especially Googlebot.
- Remember that we still have the API layer and we would like the API to be available under mydomain.xy/api
Solving our problems
We can solve issue number one with another AWS service called CloudFront. CloudFront is a CDN (Content Delivery Network). The main goals of using CDNs are security and performance. AWS CloudFront can help with HTTP vs HTTPS issues. Thanks to CloudFront, we can also consolidate multiple resources under one domain which is issue number three.
The issue number two can also be solved with CloudFront and one more AWS service called S3.
Securing our site with CDN
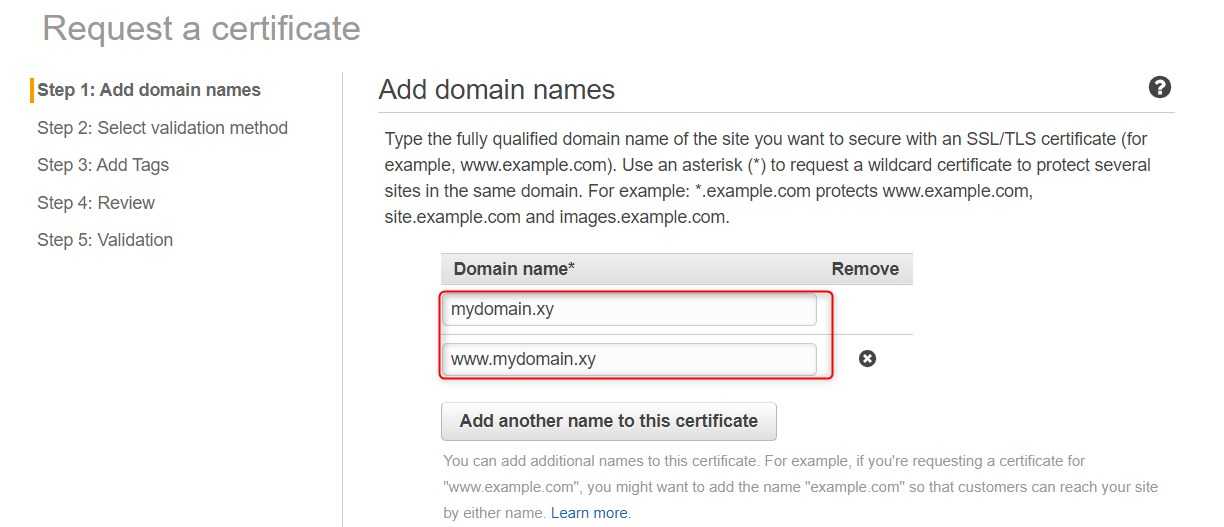
We can get a free public SSL certificate from AWS Certificate Manager. Let's see how easy it will be. First, request for a certificate for mydomain.xy and www.mydomain.xy and choose validation via DNS.
Validation is required to prove that we are the owner of the domain. If we chose Route53 as our DNS provider, we will have a shorthand method to add the DNS records.
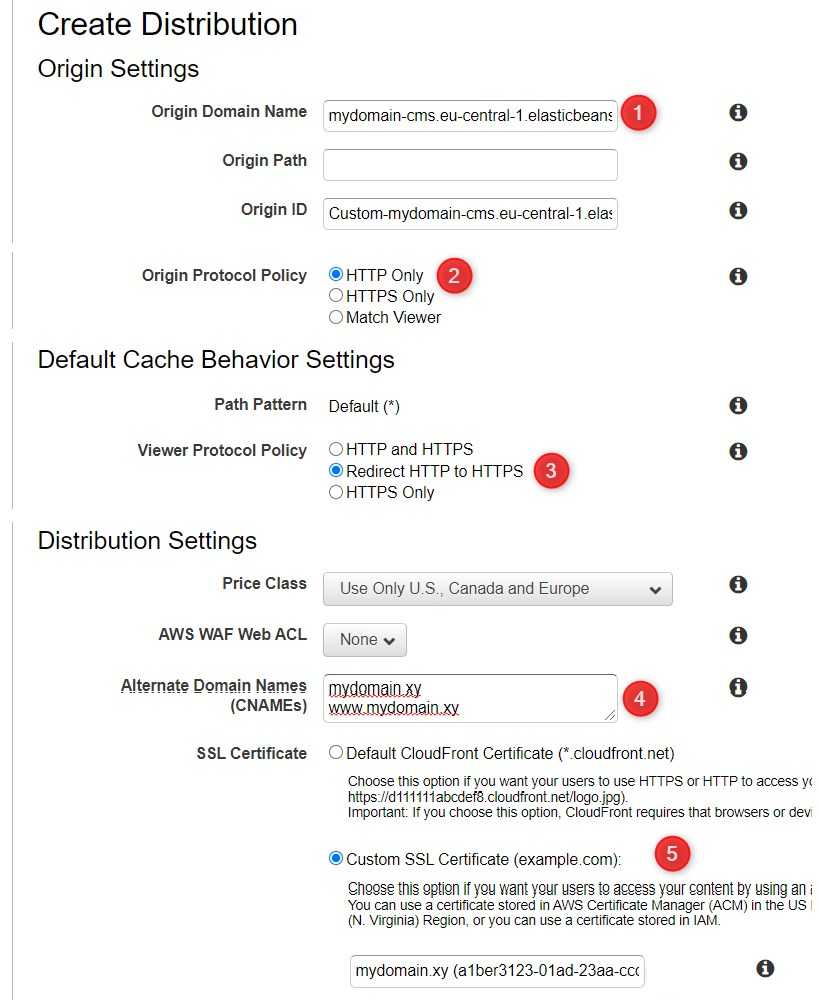
Now when we have the certificates acquired, we can create a CloudFront Web Distribution. I won't show you all the possible options when configuring the distribution, I will change only some of them, but you may want to customize the configuration.
- Of course, the Domain name has to be our domain, e.g. mydomain.xy
- I left Origin Protocol Policy as HTTP only, because my origin does not support HTTPS
- Set Viewer Protocol Policy to Redirect HTTP to HTTPS - we want our users to be able to request the page via HTTP as well as HTTPS, but we want all the HTTP requests automatically redirected to HTTPS
- We have to define our Alternate Domain Names
- And of course certificate
Apart from the above, it's worth considering such options as Caching strategy and Object compression - to lower transmission over the network.
Once all this is done, there's one more thing to change. Do you remember how we created the CNAME record for www.mydomain.xy and an A alias record for mydomain.xy? These both records point to the origin (origin is the server that generates the content). And now we want to change these records so that they point to the CloudFront distribution instead. In our case the distribution name is d3kndnvaeovvct.cloudfront.net, so we just need to replace mydomain-cms.eu-central-1.elasticbeanstalk.com with the distribution name in both our DNS records. Actually, it's worth changing the record type for www.mydomain.xy from CNAME to an A alias record.
If configured correctly, when we request for mydomain.xy we should see in the response headers something as shown below.
The message RefreshHit from Clodufront may be different e.g. Miss from CloudFront or Hit from ClodFront it just depends if the request has already been cached. The key word we are looking for is Clodfront which, if present, means we get the content from our distribution.
Now we should see that it does not matter if we request our site with http or https, in the end, the user is redirected to https://mydomain.xy and the site is secured.
Redirecting www to the apex
There is still a problem with the www.mydomain.xy though. We want our users to be redirected from www.mydomain.xy to mydomain.xy (the root domain is also known as apex). To solve this, we need a redirect in place. Fortunately, this is trivial with AWS S3 service.
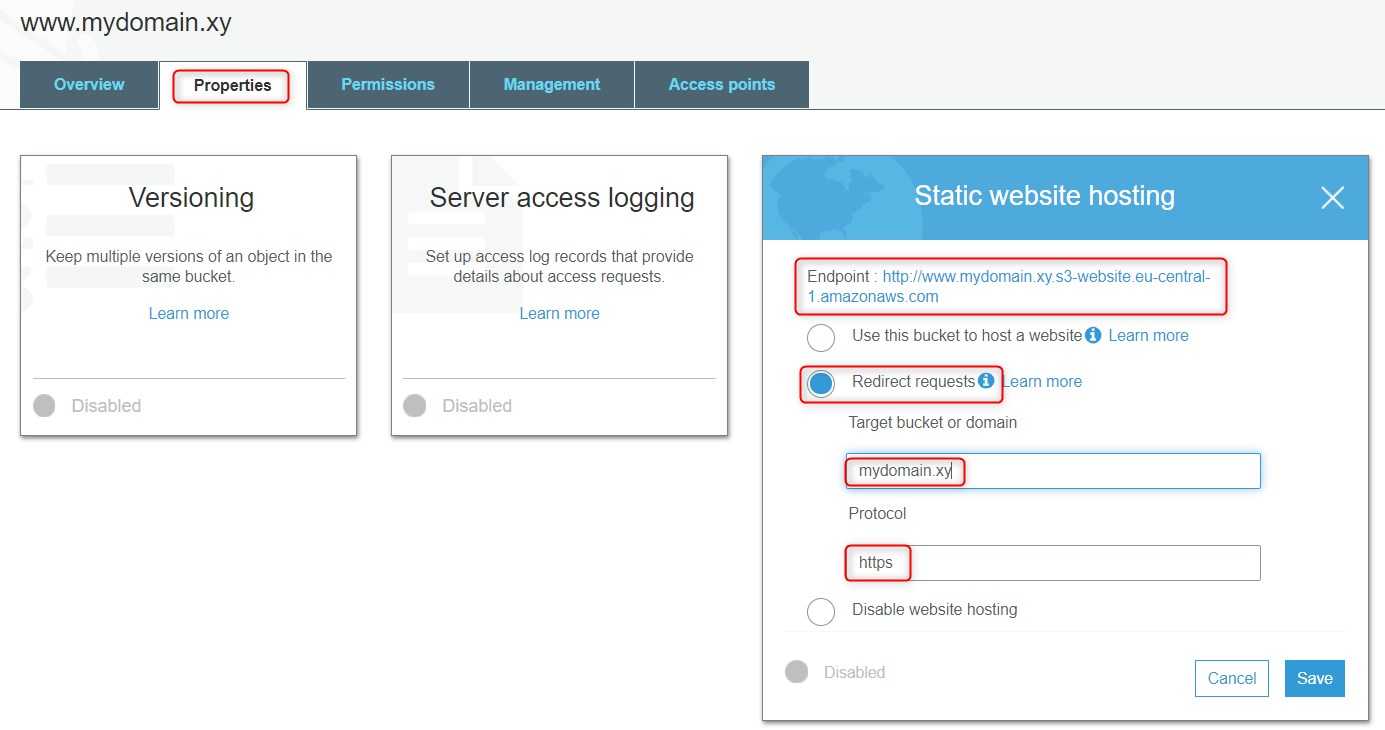
Let's create a bucket with name www.mydomain.xy (the name has to be exactly like that with www). The rest of the bucket settings leave with default values. Once the bucket is created in the properties section of the bucket, choose Static website hosting.
Copy the endpoint name which in our example is: http://www.mydomain.xy.s3-website.eu-central-1.amazonaws.com. After saving the changes if we try to open the given endpoint, we will see that we are redirected to mydomain.xy. This proves our configuration works as expected. Now we have to make the above resource being available under www.mydomain.xy That's also not that hard, but we need to do a trick. We could just change the A alias record for www.mydomain.xy to point to www.mydomain.xy.s3-website.eu-central-1.amazonaws.com. However, there's one gotcha, S3 does not support HTTPS. If we changed the A alias record for www then after requesting https://www.mydomain.xy we would get 'This site can't be reached' error in the browser. What we can do is create another CloudFront distribution. We will have two of them
- One pointing to our CMS origin and serving the real content
- And the other one pointing to our S3 bucket, which in turns points to the first distribution (the one responsible for handling the apex domain mydomain.xy)
First, let's edit our current distribution and remove from the Alternate Domain Names (CNAMEs) section the value www.mydomain.xy.
Now let's create a new distribution exactly the same as we did for the previous one apart from the fact that
- the origin Domain name will be www.mydomain.xy.s3-website.eu-central-1.amazonaws.com
- the Alternate Domain Name will be www.mydomain.xy,
- this time leave Viewer Protocol Policy as HTTP and HTTPS - thanks to that a user visiting http://www.mydomain.xy will be redirected directly to https://mydomain.xy. If we set Viewer Protocol Policy as we did before to Redirect HTTP to HTTPS then we would be first redirected to https://www.mydomain.xy and then redirected again to https://mydomain.xy
The rest of the configuration is the same. When the distribution is created, just go to its details and copy the domain name. In our case, it is d3bjlz4zjkzum4.cloudfront.net. Now let's modify the A alias record for www.mydomain.xy to point to our newly created distribution d3bjlz4zjkzum4.cloudfront.net
Make the API available under mydomain.xy/api
There's one more common case we would like to deal with. Let's do not forget that apart from the website we want to host also the API under the same domain mydomain.xy. As mentioned already, this can be done with the help of CloudFront. Let's go to our distribution created for mydomain.xy and in the tab Origins and Origin Groups let's create a new Origin. In the Origin Domain Name let's put the address of our API which is mydomain-api.eu-central-1.elasticbeanstalk.com.
Once the origin is created, the last one thing left to do is to create a Behaviour.
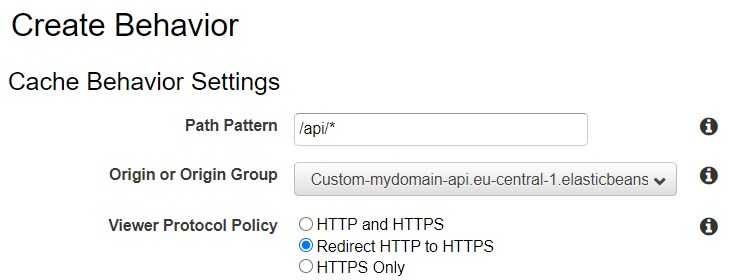
Such configuration as shown above tells CloudFront to route all the requests starting with /api/ to the origin responsible for handling API requests.
Congratulations! You have launched your first website totally on your own.
But what if I already have a domain?
In our case the domain has just been bought but if we already have one and want to switch where the domain points, we most probably just want to change our CNAME record.
What's essential, each DNS record (as you remember CNAME is one of such records) has the Time To Live, which is an instruction for DNS servers how long they can cache information about DNS records. If the TTL for the CNAME record is long e.g. 1 - 2 days, after we change the record we may need to wait for that amount of time until the new CNAME value is taken into consideration. Well, that's quite long, especially if we want our new site to be available under our domain instantly. So what could we do? Before the planned launch date of our site, we could shorten the TTL values for the records, we will be changing during the scheduled launch of our site to, e.g. 1 minute. Thanks to that, when we change the record value later, the change will be reflected much faster. Unfortunately, it does not mean it will be 1 minute – there might be a couple of such DNS servers on the route to our domain, and those servers actually are not obliged to stick to one minute of TTL – this can make the time being a couple of minutes, but that's still better than a couple of hours or days.
One may ask: "so why do I need long TTLs in the first place?" Well that's an interesting question and an excellent subject for another blog post, but the short answer is that the longer DNS servers are allowed to cache the DNS records the faster they can open for you your website when you request www.mydomain.xy.
Hero image by SpaceX on Unsplash, opens in a new window
