
Developing AEM Dispatcher configuration can be challenging. The same attribution goes to httpd configuration, especially for developers without a broad experience with it. This article will show how to release this pain with Gradle AEM Plugins using its live reload feature.
![]()
AEM instance setup using Gradle post presented how to set up AEM instances using Gradle AEM Plugins. In this blog post, you will see how to extend this previous example with AEM Dispatcher to model a production environment locally. What is more, we will cover "live reload" mode (the concept known from many JS frameworks), where each code change is immediately reflected in the application itself.
How to use this post?
There are two ways you can benefit from this article. You can read it entirely to have a good understanding of how the Environment plugin manages Dispatcher. You will know where to change the defaults and how to set up your projects.
On the other hand, if you only want to explore the live reload feature, please cover Prerequisites section, then download our example GAP project running AEM with Dispatcher, update the gradle.properties file and navigate directly to Setting up the environment to continue reading.
- Prerequisites
- Quick reminder: Configure AEM
- Configure Dispatcher
- Configure hosts
- Write health checks
- Enable live reload
- Debug Dispatcher & httpd
- Conclusions
Prerequisites
Install Docker
Gradle Environment plugin is using Docker to run services. Thanks to that, we can develop and test Dispatchers configuration directly on a dedicated OS, e.g. CentOS 7, even though we work on Windows or Mac.
You need to have Docker installed. Please refer to the official Install Docker documentation.
Notice for Docker on Windows
Ensure having shared folders enabled via GUI:
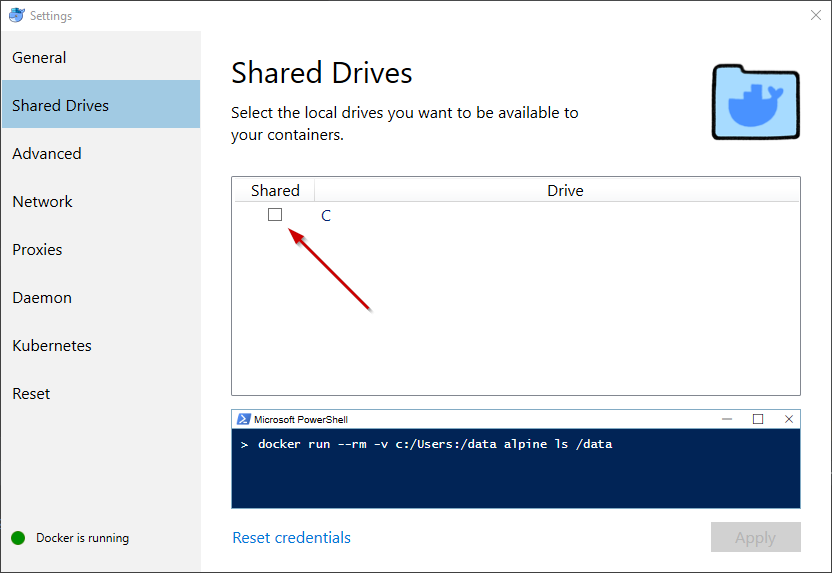
Please note that after each Windows credentials change (e.g forced by company policy), it is required to click the
button "Reset credentials" to ensure having shared drives working correctly. When running the task environmentUp first
time, Windows User Account Control (UAC) may require user confirmation to allow a virtualized container to access local
configuration files stored on shared drives.
Notice for Docker Toolbox
While using Docker Toolbox, beware that, by default, there is only one shared folder in VirtualBox configured which mounts C:/Users to /c/users on Docker Machine / Ubuntu. As a consequence, if the project is located outside of C:/Users directory, there is a need to manually add the corresponding shared folder and mount it on Docker Machine using VirtualBox GUI.
Download sample project
Download our example GAP project running AEM with Dispatcher which is a part of the GAP documentation materials. You can import it into IDE or work directly in your favorite terminal.
Quick reminder: Configure AEM
Let's start from the place, where we had AEM instances configured and running - both author and publish on our local machine. Let's quickly review how our configuration looks like:
├── build.gradle.kts
├── gradle
│   └── wrapper
│       ├── gradle-wrapper.jar
│       └── gradle-wrapper.properties
├── gradle.properties
├── gradlew
└── gradlew.bat
Gradle configuration
This project uses Gradle Wrapper and Gradle 6.6.1. You don't need to install Gradle at all. The following files will do the job:
├── gradle
│   └── wrapper
│       ├── gradle-wrapper.jar
│       └── gradle-wrapper.properties
├── gradlew
└── gradlew.bat
GAP configuration
With Gradle Wrapper covered we have only two files to go:
├── gradle.properties
├── build.gradle.kts
gradle.properties
Let's review gradle.properties, it contains three things:
- AEM distribution information to run local AEM instance
localInstance.quickstart.jarUrl=smb://smb-host/aem/6.5.0/cq-quickstart-6.5.0.jar
localInstance.quickstart.licenseUrl=/Users/user.name/aem/6.5.0/license.properties
You need to provide here valid paths to AEM distribution and license to be able to start AEM instances.
- Credentials for remote connections (SMB, HTTPS, SFTP)
fileTransfer.user=user.name
fileTransfer.password=***********
fileTransfer.domain=COMPANY_DOMAIN
You need to provide credentials if distribution files are secured.
- Local AEM instance definitions (author, publish)
# author description
instance.local-author.httpUrl=http://localhost:4502
instance.local-author.type=local
instance.local-author.runModes=local
instance.local-author.jvmOpts=-server -Xmx2048m -XX:MaxPermSize=512M -Djava.awt.headless=true
# publish description
instance.local-publish.httpUrl=http://localhost:4503
instance.local-publish.type=local
instance.local-publish.runModes=local
instance.local-publish.jvmOpts=-server -Xmx2048m -XX:MaxPermSize=512M -Djava.awt.headless=true
build.gradle.kts
build.gradle.kts applies the
Local Instance plugin to
create and start AEM instances
plugins {
    id("com.cognifide.aem.instance.local") version "14.2.9"
}
and describes how those instances will be provisioned. We ask for three things: 1) to enable crx/de, 2) install core
components and 3) install felix search console:
aem {
    instance {
        provisioner {
            enableCrxDe()
            deployPackage("com.adobe.cq:core.wcm.components.all:2.8.0@zip")
            deployPackage("com.neva.felix:search-webconsole-plugin:1.3.0")
        }
    }
}
Now we can simply run sh gradlew instanceSetup to start AEM and provision it.
> Task :instanceCreate
(...)
Instance(s) created
Which: local-author, local-publish

> Task :instanceUp
Instance(s) up
Which: local-author, local-publish

> Task :instanceProvision
Instances provisioned
Performed 6 steps(s) (6 ended, 0 failed) on 2 instance(s).

BUILD SUCCESSFUL in 8m 18s
3 actionable tasks: 3 executed
Configure Dispatcher
Having AEM instances up and running we can now focus on the AEM Dispatcher. In the "old times" we would install httpd on our machine. We would have to cover different steps depending on the OS version, etc. Only one Dispatcher configuration would be allowed at a time and switching between project would be cumbersome. There would be no guarantee that our installation works the same way as on our fellow developer machine. Yes, virtualization (e.g. Vagrant) might be a solution here. However, since we have Docker lets try the lightweight approach.
Environment plugin
Let's make use of the Environment plugin via extending our build.gradle.kts:
plugins {
    id("com.cognifide.aem.instance.local") version "14.2.9"
    id("com.cognifide.environment") version "1.0.2"
}
Now we have new capabilities available in our script. Environment plugin is general purpose and independent from GAP's core functionalities. Let's configure the Dispatcher step by step.
Dispatcher files
You can find the example dispatcher configuration based on
Adobe's Maven AEM Archetype in the src/environment/dispatcher
directory. We won't review all the files because it is the standard configuration. Please refer to the
official documentation
for a detailed explanation of the purpose of each file.
dispatcher
├── conf
│   └── httpd.conf
├── conf.d
│   ├── available_vhosts
│   │   └── default.vhost
│   ├── dispatcher_vhost.conf
│   ├── enabled_vhosts
│   │   ├── README
│   │   └── default.vhost
│   ├── rewrites
│   │   ├── default_rewrite.rules
│   │   └── rewrite.rules
│   └── variables
│       ├── custom.vars
│       ├── default.vars
│       └── global.vars
└── conf.dispatcher.d
    ├── available_farms
    │   └── default.farm
    ├── cache
    │   ├── default_invalidate.any
    │   ├── default_rules.any
    │   └── rules.any
    ├── clientheaders
    │   ├── clientheaders.any
    │   └── default_clientheaders.any
    ├── dispatcher.any
    ├── enabled_farms
    │   ├── README
    │   └── default.farm
    ├── filters
    │   ├── default_filters.any
    │   └── filters.any
    ├── renders
    │   └── default_renders.any
    └── virtualhosts
        ├── default_virtualhosts.any
        └── virtualhosts.any
Now we would like to run and test this configuration on the working dispatcher instance.
Docker compose file
The first step will be to create Docker compose file. This file will describe our "environment". We can describe one or
more services that are assembled together to build the entire system. Environment plugin uses
Docker Swarm to start stack of services based on the compose files description.
What is more, Pebble templating engine is used to configure valid paths and special
adjustments related to your host OS (lines starting with {%). In our simple example, we will have only one service
there - AEM Dispatcher:
version: "3"
services:
  dispatcher:
    image: centos/httpd:latest
    command: ["tail", "-f", "--retry", "/usr/local/apache2/logs/error.log"]
    ports:
      - "80:80"
    volumes:
      - "{{ docker.rootPath }}/src/environment/dispatcher/conf/httpd.conf:/etc/httpd/conf/httpd.conf"
      - "{{ docker.rootPath }}/src/environment/dispatcher/conf.d:/etc/httpd/conf.d"
      - "{{ docker.rootPath }}/src/environment/dispatcher/conf.dispatcher.d:/etc/httpd/conf.dispatcher.d"
      - "{{ docker.workPath }}/dispatcher/modules/mod_dispatcher.so:/etc/httpd/modules/mod_dispatcher.so"
      - "{{ docker.workPath }}/dispatcher/logs:/etc/httpd/logs"
      {% if docker.runtime.safeVolumes %}
      - "{{ docker.workPath }}/dispatcher/cache:/var/www/localhost/cache"
      - "{{ docker.workPath }}/dispatcher/htdocs:/var/www/localhost/htdocs"
      {% endif %}
    {% if docker.runtime.hostInternalIpMissing %}
    extra_hosts:
      - "host.docker.internal:{{ docker.runtime.hostInternalIp }}"
    {% endif %}
    deploy:
      replicas: 1
    networks:
      - docker-net
networks:
  docker-net:
This is probably the most complicated part. Let's review important pieces of this configuration.
Our base image is httpd on Centos from Docker Hub.
image: centos/httpd:latestCommand used to start the container is tail -f on the error log file. This is because we want the container to be
turned on all the time, even if the httpd process will be down during restarts to apply the updated configuration.
command: ['tail', '-f', '--retry', '/usr/local/apache2/logs/error.log']The next thing is mounting directories into the container. We follow here the centos/httpd image structure and mount
source configuration files from our project. One important distinction here is between source files (starting with
rootPath) and work files (starting with workPath). If we refer to the configuration source code we are in the
context of our project (docker.rootPath). However, if we want to mount logs or cache directories it is better to
stay inside the temporary build directory (docker.workPath). The second will be cleared frequently, the first kept
under version control.
You can also notice the mounting of the httpd's dispatcher module. Getting Dispatcher distribution section will describe where this comes from.
volumes:
  # configuration
  - '{{ docker.rootPath }}/src/environment/dispatcher/conf/httpd.conf:/etc/httpd/conf/httpd.conf'
  - '{{ docker.rootPath }}/src/environment/dispatcher/conf.d:/etc/httpd/conf.d'
  - '{{ docker.rootPath }}/src/environment/dispatcher/conf.dispatcher.d:/etc/httpd/conf.dispatcher.d'
  # work directories
  - '{{ docker.workPath }}/dispatcher/logs:/etc/httpd/logs'
  - '{{ docker.workPath }}/dispatcher/cache:/var/www/localhost/cache'
  - '{{ docker.workPath }}/dispatcher/htdocs:/var/www/localhost/htdocs'
  # dispatcher mod - installed using Environment plugin
  - '{{ docker.workPath }}/dispatcher/modules/mod_dispatcher.so:/etc/httpd/modules/mod_dispatcher.so'
Because we describe here the local environment we will always deploy our service in one replica
deploy:
  replicas: 1
Also, our Docker stack networking is very simple here. We have only one network "docker-net".
networks:
  - docker-net
There are also a few "technical details" going on, which we shouldn't bother about. Those are there purely to ensure, that our configuration will work smoothly on all Docker implementations: Docker for Mac, Docker for Windows, Docker Toolbox and Docker for Linux.
{% if docker.runtime.safeVolumes %}
  - "{{ docker.workPath }}/dispatcher/cache:/var/www/localhost/cache"
  - "{{ docker.workPath }}/dispatcher/htdocs:/var/www/localhost/htdocs"
{% endif %}
{% if docker.runtime.hostInternalIpMissing %}
extra_hosts:
  - "host.docker.internal:{{ docker.runtime.hostInternalIp }}"
{% endif %}
Environment plugin configuration
Now we need to tell the Environment plugin to use Docker to configure the "dispatcher" service for us. There are 4 different hooks/callbacks we can use.
resolve- configuration phase, before the container is started, we have a chance to download necessary files or create directoriesup- we can specify startup command for httpd process and create directories within the started containerreload- we can specify a command to reload httpd and perform necessary cleanups between restartsdev- live reload configuration
environment { // https://github.com/Cognifide/gradle-environment-plugin
    docker {
        containers {
            "dispatcher" {
                resolve { }
                up { }
                reload { }
                dev { }
            }
        }
    }
}
Getting Dispatcher distribution
AEM is licensed software, so you can point the distribution of Dispatcher you got from Adobe in the first place. Additionally, let's create any temporary directories that will be needed later: "htdocs", "cache" and "logs". If you remember Docker compose file, those will be available under the work directory and mounted to httpd container. We could then review log files directly on the host machine without the need to exec into httpd container.
resolve {
    resolveFiles {
        download("http://download.macromedia.com/dispatcher/download/dispatcher-apache2.4-linux-x86_64-4.3.3.tar.gz").use {
            copyArchiveFile(it, "**/dispatcher-apache*.so", file("modules/mod_dispatcher.so"))
        }
        ensureDir("htdocs", "cache", "logs")
    }
}
Start Dispatcher
Another piece of configuration describes how to start the httpd process. First, we create all directories needed on the container. Then we specify a command to start the process.
up {
    ensureDir("/usr/local/apache2/logs", "/var/www/localhost/htdocs", "/var/www/localhost/cache")
    execShell("Starting HTTPD server", "/usr/sbin/httpd -k start")
}
Reload Dispatcher
Another callback we configure is the restart hook. It is a good development practice to clean the cache directory between restarts and specify the restart command.
reload {
    cleanDir("/var/www/localhost/cache")
    execShell("Restarting HTTPD server", "/usr/sbin/httpd -k restart")
}
Setting up the environment
Having all this configured and Docker running lets set up the entire environment. Make sure port 80 is free in your system, so the dispatcher can use it.
sh gradlew setupAssuming your AEM instances are already up and running it should take up to a minute to start. In case you starting AEM for the first time it might take up to 10-15 minutes depending on your machine.
sh gradlew setup
> Task :environmentUp
Environment up
Turned on with success

> Task :instanceCreate
No instances to create.

> Task :instanceUp
No instances to turn on.

> Task :instanceProvision
No steps to perform / all instances provisioned.

BUILD SUCCESSFUL in 22s
4 actionable tasks: 4 executed
We can now see a new stack running on Docker Swarm:
docker service ls
ID                  NAME                                  MODE                REPLICAS            IMAGE                 PORTS
yxpek25js33d        aem-dispatcher-with-ease_dispatcher   replicated          1/1                 centos/httpd:latest   *:80->80/tcp
The container named aem-dispatcher-with-ease_dispatcher works now on port 80. Let's open localhost in a browser. You
should see the home page of the "We-Retail" sample website.
Configure hosts
Important part of AEM stack configuration are hosts. We can also specify them in the environment DSL:
hosts {
    "http://example.com" { tag("live") }
}
Base on this configuration we can use scripts available in our example project (hosts for Unix or hosts.bat for
Windows) that will simplify applying this configuration with Administrator/SuperUser rights. Simply run script dedicated
for your OS to update your etc/hosts configuration file.
# UNIX
✗ sh hosts
127.0.0.1       example.com
Please open http://example.com in a browser. You should see again the "We Retail" website.
Write health checks
Manually checking the website content is time-consuming. Environment DSL offers you a way to specify health checks for your services.
healthChecks {
    http("Site 'live'", "http://example.com", "For those who challenge the elements")
    http("Author Sites Editor", "http://localhost:4502/sites.html") {
        containsText("Sites")
        options { basicCredentials = aem.authorInstance.credentials }
    }
}
Now simply running sh gradlew instanceAwait will perform those health checks for you.
Enable live reload
Now, when we have both author and publish instances up and Dispatcher working on Docker, plus a list of health checks
written, we can take advantage of the live reload feature. The only thing we need to configure in build.gradle.kts is
the directory that will be watched during development. In our case that would be the src/environment/dispatcher
directory containing all configuration files:
dev {
    watchRootDir("src/environment/dispatcher")
}
Let's have a look at how that works all together in two scenarios
- When we introduce a silent bug, httpd reloads without any problem, but our mappings are not valid anymore.
- When we introduce a fatal error, httpd fails to reload and we do not see a difference in the behavior of our application but our configuration is totally wrong.
Tracing silent bugs
- Execute
sh gradlew environmentDevto start live reload - Open
src/environment/dispatcher/conf.dispatcher.d/dispatcher.anyfile and comment out the only active include with hash:# $include "enabled_farms/*.farm" - Open http://example.com URL in the browser - you'll get 404 error
- Review
environmentDevlogs - Revert the change in the
dispatcher.anyfile - Review
environmentDevlogs again
What has exactly happened? We've broken the dispatcher's configuration, no farms were loaded. Because httpd was able to reload we got no errors in the log - however, thanks to our health checks, the Environment plugin was able to alert us about the problem!
Reloading container 'dispatcher' due to file changes:
/Users/damian.mierzwinski/code/gap/gradle-aem-plugin/docs/blog/2020-08-01-dispatcher/src/environment/dispatcher/conf.dispatcher.d/dispatcher.any [file changed]

> Task :environmentDev
Environment health check(s) failed. Success ratio: 1/2 (50.00%):
[-] Site 'live' | Failed request to GET http://example.com HTTP/1.1! Cause: Unexpected response status detected: HTTP/1.1 404 Not Found
[+] Author Sites Editor
<-------------> 0% EXECUTING [34m 31s]
> :environmentDev > Watching files
Then, when we fixed the problem everything got back to normal. Health checks passed again:
Reloading container 'dispatcher' due to file changes:
/Users/damian.mierzwinski/code/gap/gradle-aem-plugin/docs/blog/2020-08-01-dispatcher/src/environment/dispatcher/conf.dispatcher.d/dispatcher.any [file changed]

> Task :environmentDev
Environment health check(s) succeed: 2/2 (100.00%)
What is important here, on each reload, cache was cleaned thanks to our reload configuration:
reload {
    cleanDir("/var/www/localhost/cache")
}
This way we can be sure that health checks are showing us valid results.
Tracing fatal errors
- Execute
sh gradlew environmentDevto start live reload - Open
src/environment/dispatcher/conf/httpd.conffile and introduce an error into it, e.g. via adding "ERROR" string as a last line - Open http://example.com URL in the browser - it will work just fine
- Review
environmentDevlogs - Revert the change in the
httpd.conffile - Review
environmentDevlogs again
This time we introduced fatal error in the configuration. Environment plugin recognized change in the httpd.conf file
and tried to reload httpd but failed:
Reloading container 'dispatcher' due to file changes:
/Users/damian.mierzwinski/code/gap/gradle-aem-plugin/docs/blog/2020-08-01-dispatcher/src/environment/dispatcher/conf/httpd.conf [file changed]
AH00526: Syntax error on line 357 of /etc/httpd/conf/httpd.conf:
The Error directive was used with no message.
Cannot reload container 'dispatcher' properly!
com.cognifide.gradle.environment.docker.container.ContainerException: Failed to perform operation "Restarting HTTPD server" on container 'dispatcher'!
Docker command process failure! Command: 'docker exec 9e61bef27cbf sh -c "/usr/sbin/httpd -k restart"', error: 'null', exit code: '1'
        at com.cognifide.gradle.environment.docker.Container$exec$action$1.invoke(Container.kt:146)
        (...)
        at kotlinx.coroutines.scheduling.CoroutineScheduler$Worker.run(CoroutineScheduler.kt:665)
Next, we fixed the error. Again, Environment plugin reloaded httpd, this time with success, and performed all the defined health checks for us:
Reloading container 'dispatcher' due to file changes:
/Users/damian.mierzwinski/code/gap/gradle-aem-plugin/docs/blog/2020-08-01-dispatcher/src/environment/dispatcher/conf/httpd.conf [file changed]

> Task :environmentDev
Environment health check(s) succeed: 2/2 (100.00%)
Simple as that.
Debug Dispatcher & httpd
In case of a deeper problem, when it is not straight forward what got wrong, it is always good to review logs or cached
files. Thanks to the configuration we have (docker-compose file and environment DSL) both log and cache directories
are available directly from our project. Simply navigate to .gradle/environment/dispatcher - a temporary work
directory. You can tail logs, review or alter any cached file, and your changes will immediately take effect:
environment
├── dispatcher
│   ├── cache
│   │   └── content
│   │       └── we-retail
│   │           └── us
│   │               ├── en.html
│   │               └── en.html.h
│   ├── htdocs
│   ├── logs
│   │   ├── access_log
│   │   ├── dispatcher.log
│   │   ├── error_log
│   │   ├── healthcheck_access_log
│   │   └── httpd_access.log
│   └── modules
│       └── mod_dispatcher.so
└── docker-compose.yml
Conclusions
Development of the Dispatchers and httpd configuration can be a troublesome task. Some changes can introduce fatal errors, preventing httpd from reloading. Some of them can introduce silent bugs. Additionally, manually reloading httpd slows down the feedback loop. The Environment plugin removes all this burden from your shoulders. You can see immediately if you move in the right direction. Health checks are a great way to describe how your system is expected to behave and can be also used as a good source of documentation. What is important, this documentation is always live and validated during development!
Go ahead and try live reload, which is also available as part of the Gradle AEM Multi project archetype. All following Adobe's best practices.
