The main purpose of Azure Custom Vision is to help the image prediction process. Check out how to create a basic integration with Video Indexer service using Java in order to enhance it even more.
Integration
Let's start with a short description of what Video Indexer is. It's a service from Azure Media Services that is built on top of some other services like Cognitive Services, Computer Vision, Custom Speech service and others. It allows us to retrieve some valuable information and insights from a video. Generally speaking, the tool analyzes (indexes) your uploaded video and returns that information about recognized characters, brands, spoken words, labels (tags) to us. It also cuts the video into shots and keyframes and provides some basic metadata information. If you want to learn about the possibilities of Video Indexer, please visit Microsoft's official documentation.
There are two ways of such integration.
- Video Indexer provides out of the box integration with Custom Vision. The feature itself is called "Animated characters (preview)", it is only available for Custom Vision paid accounts. The paid account is necessary only for the connection with the Video Indexer in order to be able to connect a Custom Vision published model with it. In general terms, by connecting those two services together, you should be able to detect and recognize animated content in an uploaded and indexed video. Please check the official documentation for setup and usage instructions.
- The second way is a bit more complicated and it needs some coding from our side, but it is much more promising and fits in most of use cases. As you know, Video Indexer can cut the video into shots and keyframes. Each keyframe can be easily accessed through the API, more specifically from the Get Video Thumbnail endpoint. All the keyframes are available and listed (with their IDs) after a successful indexing of a video by the Get Video Index endpoint. This endpoint returns all information gathered by the Video Indexer about a particular video that you uploaded for analysis. In the returned JSON, you will find an array called "shots" which contains all the keyframes for particular shot with their IDs.
{
  "shots": [
    {
      "id": 1,
      "tags": ["Medium", "CenterFace", "Indoor"],
      "keyFrames": [
        {
          "id": 1,
          "instances": [
            {
              "thumbnailId": "23c325fg-96f8-16z3-8213-c9ce65ab48e4",
              "adjustedStart": "0:00:00.24",
              "adjustedEnd": "0:00:00.28",
              "start": "0:00:00.24",
              "end": "0:00:00.28"
            }
          ]
        },
        {
          "id": 2,
          "instances": [
            {
              "thumbnailId": "bkk49cb41b4-54a8-4d30-f6d1-4db0342dc74",
              "adjustedStart": "0:00:01",
              "adjustedEnd": "0:00:01.04",
              "start": "0:00:01",
              "end": "0:00:01.04"
            }
          ]
        }
      ],
      "instances": [
        {
          "adjustedStart": "0:00:00",
          "adjustedEnd": "0:00:06.36",
          "start": "0:00:00",
          "end": "0:00:06.36"
        }
      ]
    }
  ]
}
Enough with words, let's do some coding. For this example, we will use the REST APIs of Custom Vision and Video Indexer and also the published model that I have already trained in the previous blogpost. Also, there aren't any unofficial API wrappers written in Java for Video Indexer and that's why we have to use REST. (Unlike in Python).
The plan
- We will get the JSON response from the Get Video Index endpoint and then extract the thumbnail IDs from it.
- For each ID we will hit Get Video Thumbnail endpoint to get the image as a byte array.
- For all the images, which represent each keyframe in our video, we will use the Detect Image endpoint from Custom Vision.
- Finally, we will iterate over all predictions and see if there are any that fulfil our requirements.
For all the HTTP requests, I've used the Apache HttpComponents project but you can of course use another library. At first, we need to get an access token with which we will authenticate the rest of the Video Indexer operations.
public static String getAccessToken(String accountId) throws IOException {
    String accessToken;

    try (CloseableHttpClient httpClient = HttpClients.createDefault()) {
        final HttpGet httpGet = new HttpGet(BASE_URI + String.format(AUTH_SERVICE_PATH, LOCATION, accountId));
        httpGet.setHeader(OCP_HEADER, VI_SUBSCRIPTION_KEY);

        try (CloseableHttpResponse response = httpClient.execute(httpGet)) {
            accessToken = EntityUtils.toString(response.getEntity(), StandardCharsets.UTF_8);
        }
    }

    return Optional.ofNullable(accessToken)
        .map(body -> body.replace("\"", ""))
        .map(body -> body.replaceAll("(\r\n|\n)", ""))
        .orElse(null);
}
This token has to be added in each of our next requests - Video Indexer is using "Bearer Authentication". Now, we can get all insights of our analyzed video from the Get Video Index endpoint.
public static VideoIndexerResponse getIndexedVideo(String accessToken, String accountId, String videoId) throws IOException {
    VideoIndexerResponse videoIndexerResponse = null;
    ObjectMapper objectMapper = new ObjectMapper();
    objectMapper.configure(DeserializationFeature.FAIL_ON_UNKNOWN_PROPERTIES, false);
    try (CloseableHttpClient httpClient = HttpClients.createDefault()) {
        final HttpGet httpGet = new HttpGet(BASE_URI + String.format(INDEX_SERVICE_PATH, LOCATION, accountId, videoId));
        httpGet.setHeader(OCP_HEADER, VI_SUBSCRIPTION_KEY);
        httpGet.setHeader("Authorization", "Bearer " + accessToken);

        try (CloseableHttpResponse response = httpClient.execute(httpGet)) {
            videoIndexerResponse = objectMapper.readValue(response.getEntity().getContent(), VideoIndexerResponse.class);
        }
    }

    return videoIndexerResponse;
}
Let's create some POJOs and also use Lombok to accelerate the deserialization process of the JSON response. We will also need a helper function which will extract all the thumbnail ids from the response and add them to a list.
public static List<String> toThumbnailIds(VideoIndexerResponse videoIndexerResponse) {
    return videoIndexerResponse.getVideos().stream()
        .map(Video::getInsights)
        .flatMap(insights - > insights.getShots().stream())
        .flatMap(shot - > shot.getKeyFrames().stream())
        .flatMap(keyframe - > keyframe.getInstances().stream())
        .map(Instance::getThumbnailId)
        .collect(Collectors.toList());
}
After doing that, we can call the Get Video Thumbnail endpoint, retrieve the original keyframe, send the image to Detect Image endpoint for analysis and finally validate the predictions.
List<String> thumbnailIds = VideoIndexerService.toThumbnailIds(videoIndexerResponse);

for (String id: thumbnailIds) {
    byte[] image = VideoIndexerService.getThumbnail(accessToken, VI_ACCOUNT_ID, VI_VIDEO_ID, id);
    CustomVisionResponse customVisionResponse = CustomVisionService.detectImage(CV_PREDICTION_KEY, CV_PROJECT_ID, CV_PUBLISHED_AS_NAME, image);
    CustomVisionService.detectEnsoLogo(customVisionResponse, id);
}
Does it work?
Let's see. We have to download a sample video (in my case it lasts 5 seconds) and add one of Enso (our brand) test images at the beginning of it and then index it on Video Indexer. As you can see, the image contains the Enso logo in the upper left corner and that's exactly what we want to detect. The tag is named "logo-enso" in the Custom Vision platform.
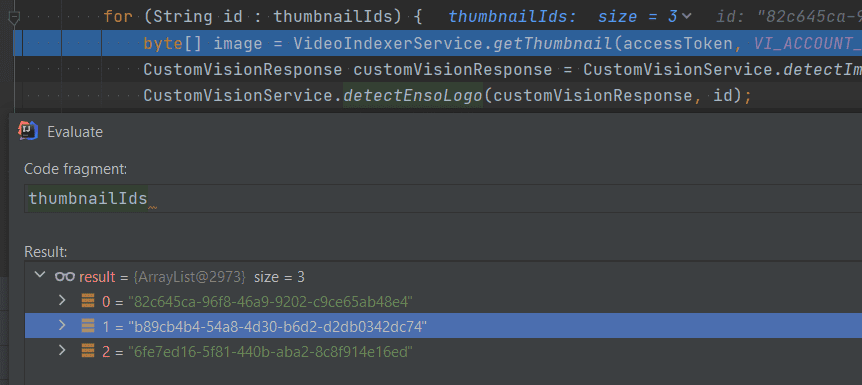
Our video lasts 5 seconds, and our app extracts 3 thumbnails from it.
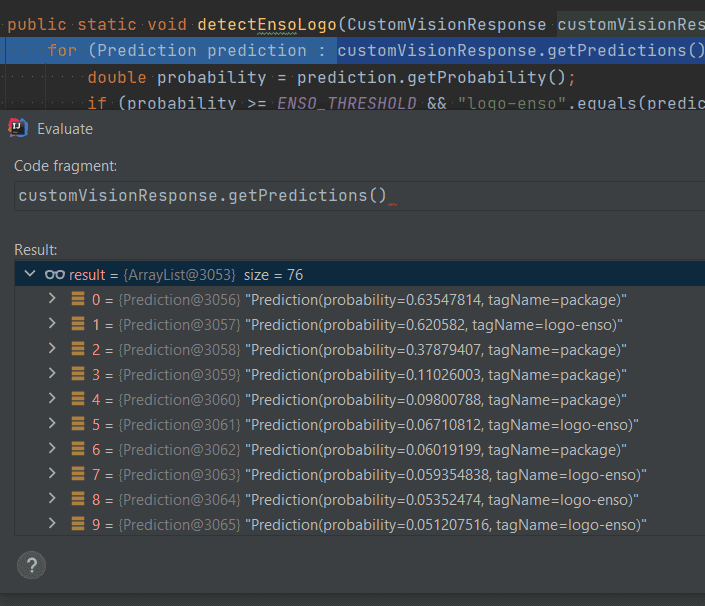
The first thumbnail, is the one that interests us because it's the test image that we've added to our sample test video. Moving on with the code, Custom Vision finds 76 predictions for the first thumbnail, but the second prediction from the list is what we are looking for because it has a tagName property equal to "logo-enso" and satisfactory probability percentage.
After the app execution, we can see in the output that only the second prediction was printed out as detected and this is what we wanted to achieve. We wanted to find, from all of keyframes in the video, those which contain the "logo-enso", and the probability is higher than 60%. The first thumbnail contained this logo with probability of ~62%.
[main] INFO com.wt.integration.videoindexer.VideoIndexerService - Getting thumbnailId 82c645ca-96f8-46a9-9202-c9ce65ab48e4...
[main] INFO com.wt.integration.customvision.CustomVisionService - Detected ENSO logo in thumbnail with id 82c645ca-96f8-46a9-9202-c9ce65ab48e4. Probability: 0.620582.
[main] INFO com.wt.integration.videoindexer.VideoIndexerService - Getting thumbnailId b89cb4b4-54a8-4d30-b6d2-d2db0342dc74...
[main] INFO com.wt.integration.videoindexer.VideoIndexerService - Getting thumbnailId 6fe7ed16-5f81-440b-aba2-8c8f914e16ed...
The whole application can be found on my Github. If you want to test it out yourself, remember to prepare and train a Custom Vision project according to my first blogpost, prepare a test sample video and set the appropriate keys in the configuration class of the app. Our example was simple, the video was short and that's why the detection was fast. For longer videos it's obvious that the process will take more time. Please check also Custom Vision pricing and Video Indexer pricing so you won't have to deal with unwanted surprises later on.
Summary
In the previous blog post about Custom Vision you could check how to get things started. We went through some basics like using the web app or the REST Api. In this blog post we saw how to integrate Custom Vision with Video Indexer together in order to detect some custom things, in our case custom brand logo. I hope that you liked it and you will find some of those information useful in your project.
Hero image by Liam Welch, opens in a new window


