An effective developer is a satisfied developer. Automation for AEM development that works with any IDE can simplify your workflow. No upgrades, no compatibility issues, just work.
Introduction
AEM developers have a variety of tools at their disposal to automate common tasks. These tools generally fall into two categories:
- IDE-specific plugins/extensions, such as AEM Developer Tools, AEM IDE, and VSCode AEM Sync.
- IDE-agnostic tools, like AEM Compose, VLT CLI, and AEM Sync.
IDE-specific tools are often tied to a particular IDE, which can pose challenges when developers use different IDEs or when the plugin isn't compatible with the latest IDE version. Additionally, high-quality plugins may come with a cost, creating a barrier for some developers. Free alternatives often lack proper maintenance and documentation.
Given these issues, many developers opt for IDE-agnostic tools, which offer greater flexibility and can be integrated into any development workflow. This article focuses on these IDE-agnostic tools and demonstrates their integration with IntelliJ IDEA, a popular choice among AEM developers, based on our observation.
IDE-agnostic tools are those that can be used to develop AEM projects without being tied to a specific IDE, such as IntelliJ IDEA, VS Code, or Eclipse. This flexibility allows developers to use their preferred text editor or IDE for AEM projects.
Standalone CLI tools, such as AEM Compose or bash scripts, are particularly useful as they can be used in any environment, including CI/CD pipelines, and are easy to integrate with other tools.
There are numerous AEM tasks that can be automated. However, in this article, we will concentrate on the most common ones in our experience:
- Pulling JCR content from an AEM instance to a local codebase,
- Executing Groovy Scripts on an AEM instance during development.
What's particularly noteworthy here is that we will automate these tasks as external tools in IntelliJ IDEA. This allows them to be executed using a single keyboard shortcut or two mouse clicks, which can be quite a time saver.
Pulling JCR content
In the times before AEM 6.0, it was not uncommon to see tutorials or even official documentation advocating the use of CRXDE Lite to develop code in JSP/CSS/JS files directly on an AEM instance. Those of us favouring a more organised approach, one based on a full-fledged IDE with powerful search and refactoring capabilities, found other ways, be it through Maven plugins or others. However, one thing can be said in favour of tweaking JSPs or content nodes directly in the repository: everything was reloaded automatically, so the development process was quite fast.
With AEMaaCS being the new standard, the situation has changed. Now, the application needs to be developed externally and then deployed to an AEM instance, which involves organizing it into CRX packages in a way recognized by Cloud Manager. This, in turn, builds the Docker images required for our environment to run. With this architecture in place, many of the things we used to edit on a whim have become immutable content.
That said, we still have that capability when working with local development environments powered by the AEM SDK, and we are able to develop code directly on the instance like in the old times, if we should so choose. This time, however, we have the ability to synchronize the changes made on the instance with the local codebase when everything works as expected. Based on our experience, this is the most effective way to work and the least error-prone, and we honestly recommend it to everyone.
Let's assume that we are working on a project named mysite (just generated from AEM Project Archetype) that uses the AEM Compose tool (AEMC) described in a separate post. Then, the development workflow might look like this:
- Using CRXDE Lite, create all necessary content directly on AEM. This includes AEM pages, components, template types, policies, etc., under the paths /apps/mysite and /conf/mysite.
- Synchronize the content with your local codebase using the AEM Compose tool.
- Build a CRX package and deploy it to the AEM instances using the AEM Compose tool, which performs extensive health checks post-deployment.
Suppose we need to improve an AEM component, such as the 'text' component. Here are the steps to follow:
- Update the component dialog in CRXDE Lite. You can access it at the URL http://localhost:4502/crx/de#/apps/mysite/components/text/_cq_dialog.xml.
- Open the AEM page editor to verify if the component dialog is functioning as expected.
-
Synchronize the component configuration with your local codebase using the following command:
sh aemw content pull -A --clean --path "ui.apps/src/main/content/jcr_root/apps/mysite/components/text" -
Optionally, e.g., right before making a pull request, build and deploy the CRX package to the AEM instances to confirm that the synchronized changes are persisted correctly:
mvn clean install && sh aemw package deploy --file "all/target/*.zip"
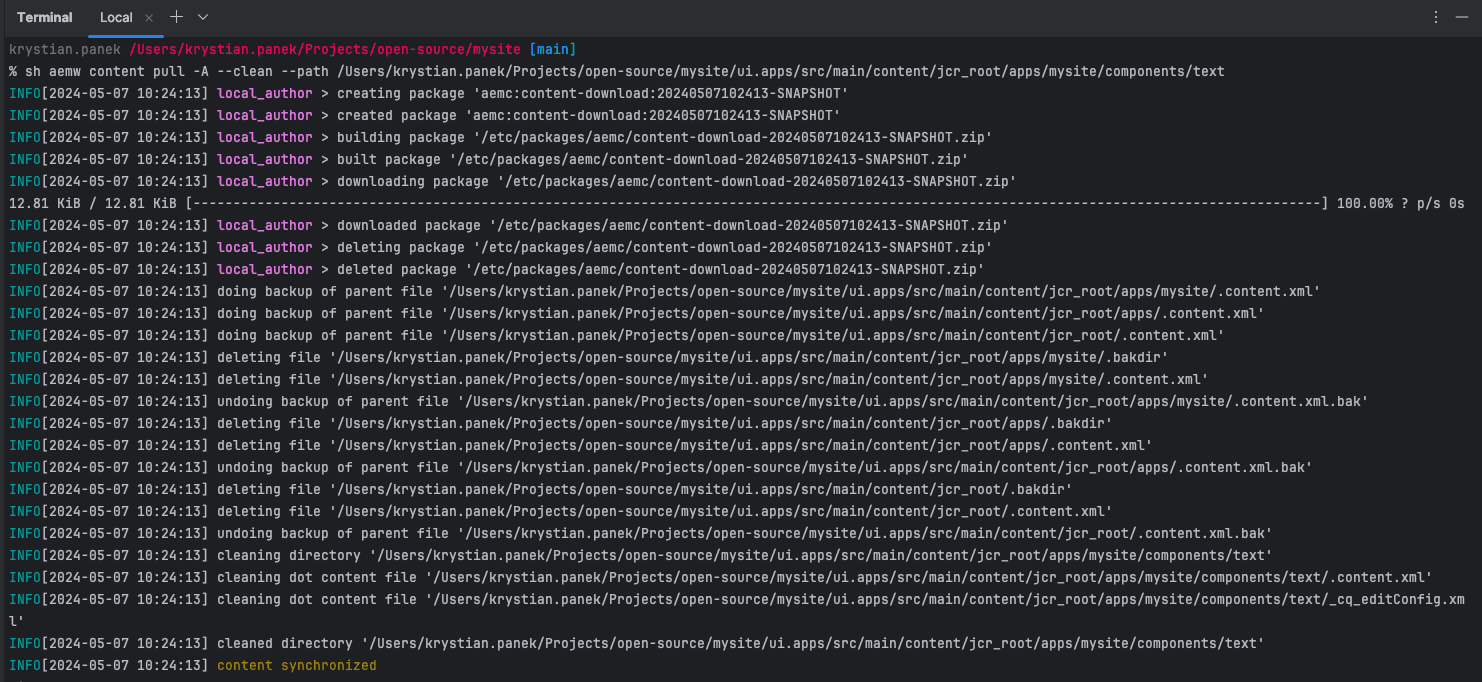
The result of the pull command might look like this:
While the workflow of developing directly on an AEM instance may not seem intuitive at first, it can effectively address common issues that arise when developers manipulate XML files directly in their codebase before deployment. These issues include:
- Human-specific errors that are difficult to detect, such as typos, unclosed or duplicated sibling tags, and improperly encoded characters.
- A time-consuming deployment process and an unnecessarily long feedback loop after each code change due to the need to build and deploy CRX packages.
However, many developers are not aware of the possibility of syncing content from the AEM instance back to their codebase, which can eliminate these problems. That's why the AEMC tool has introduced content sync features with the aim of providing a long-term sync solution that could potentially change developers' habits. Note that it is not only syncing content but also performing normalization (notice the --clean switch of the pull command). The corresponding AEMC configuration looks as follows:
content:
  clean:
    files_deleted:
      - patterns:
          - "**/.vlt"
          - "**/.vlt*.tmp"
          - "**/install/*.jar"
    files_flattened:
      - "**/_cq_design_dialog/.content.xml"
      - "**/_cq_dialog/.content.xml"
      - "**/_cq_htmlTag/.content.xml"
      - "**/_cq_template/.content.xml"
    properties_skipped:
      - patterns: "jcr:uuid"
        excluded_paths: [ "**/home/users/*", "**/home/groups/*" ]
      - patterns: "cq:lastModified*"
        excluded_paths: [ "**/content/experience-fragments/*" ]
      - patterns: [ "dam:sha1", "dam:size" ]
        included_paths: [ "**/content/dam/*.svg/*" ]
      - patterns:
          - "jcr:lastModified*"
          - "jcr:created*"
          - "jcr:isCheckedOut"
          - "cq:lastReplicat*"
          - "cq:lastRolledout*"
          - "dam:extracted"
          - "dam:assetState"
          - "dc:modified"
          - "*_x0040_*"
          - "cq:name"
          - "cq:parentPath"
          - "dam:copiedAt"
          - "dam:parentAssetID"
          - "dam:relativePath"
    mixin_types_skipped:
      - patterns:
          - "cq:ReplicationStatus"
          - "mix:versionable"
    namespaces_skipped: true
By default, AEMC normalizes the content by removing unnecessary properties, flattening XML files to unify the structure, skipping specific redundant properties, and cleaning unused mixin types and namespaces.
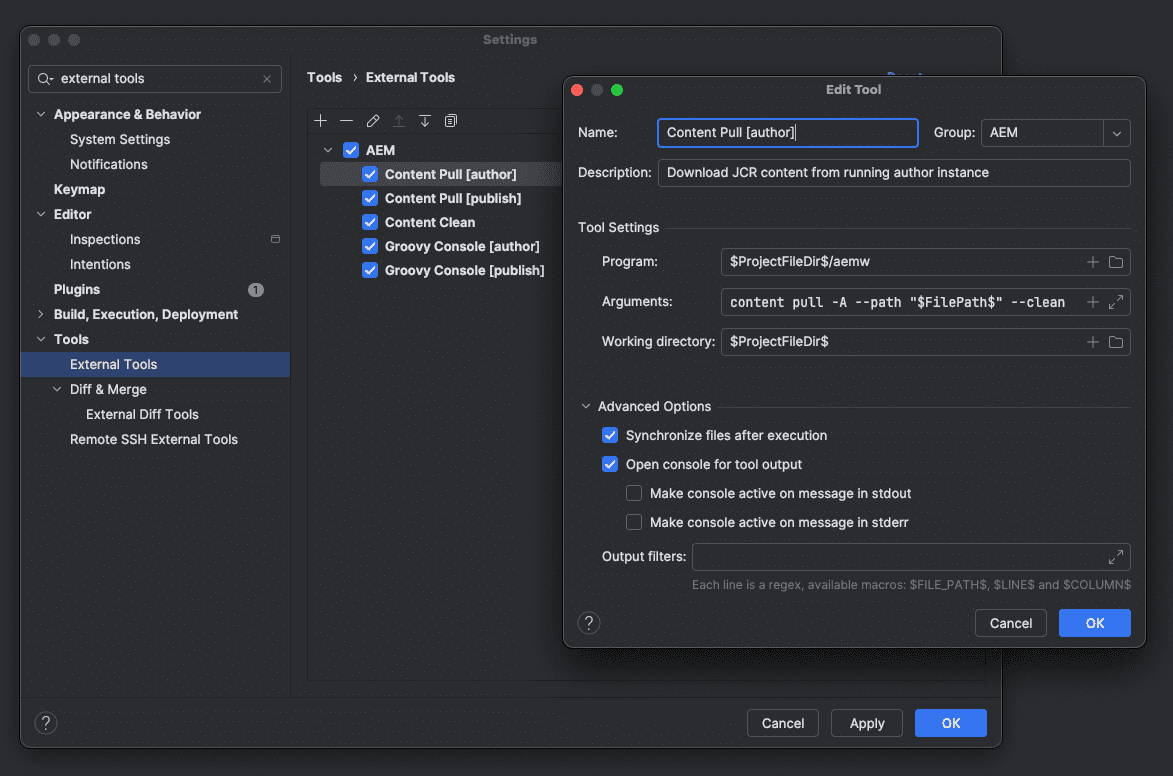
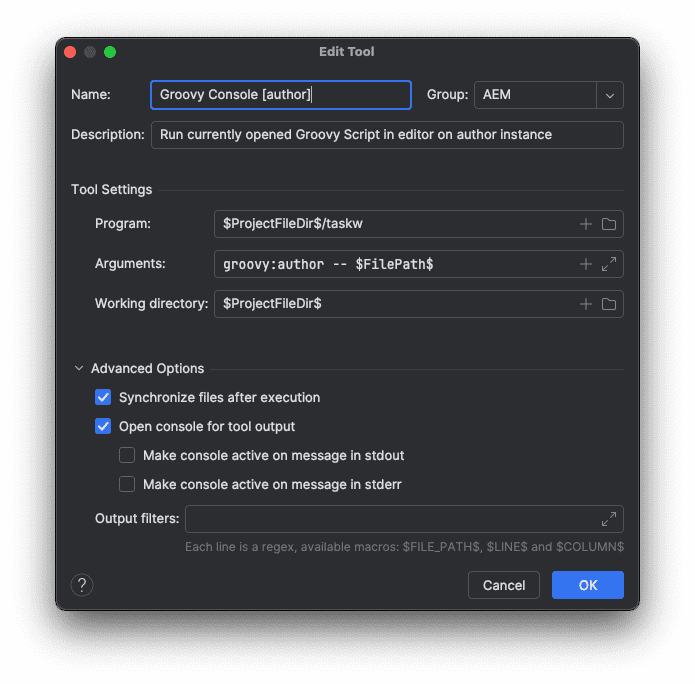
Moreover, the CLI command for downloading JCR content from the instance can be conveniently wrapped as an external tool in IntelliJ IDEA or any other IDE of choice.
See how to configure it:
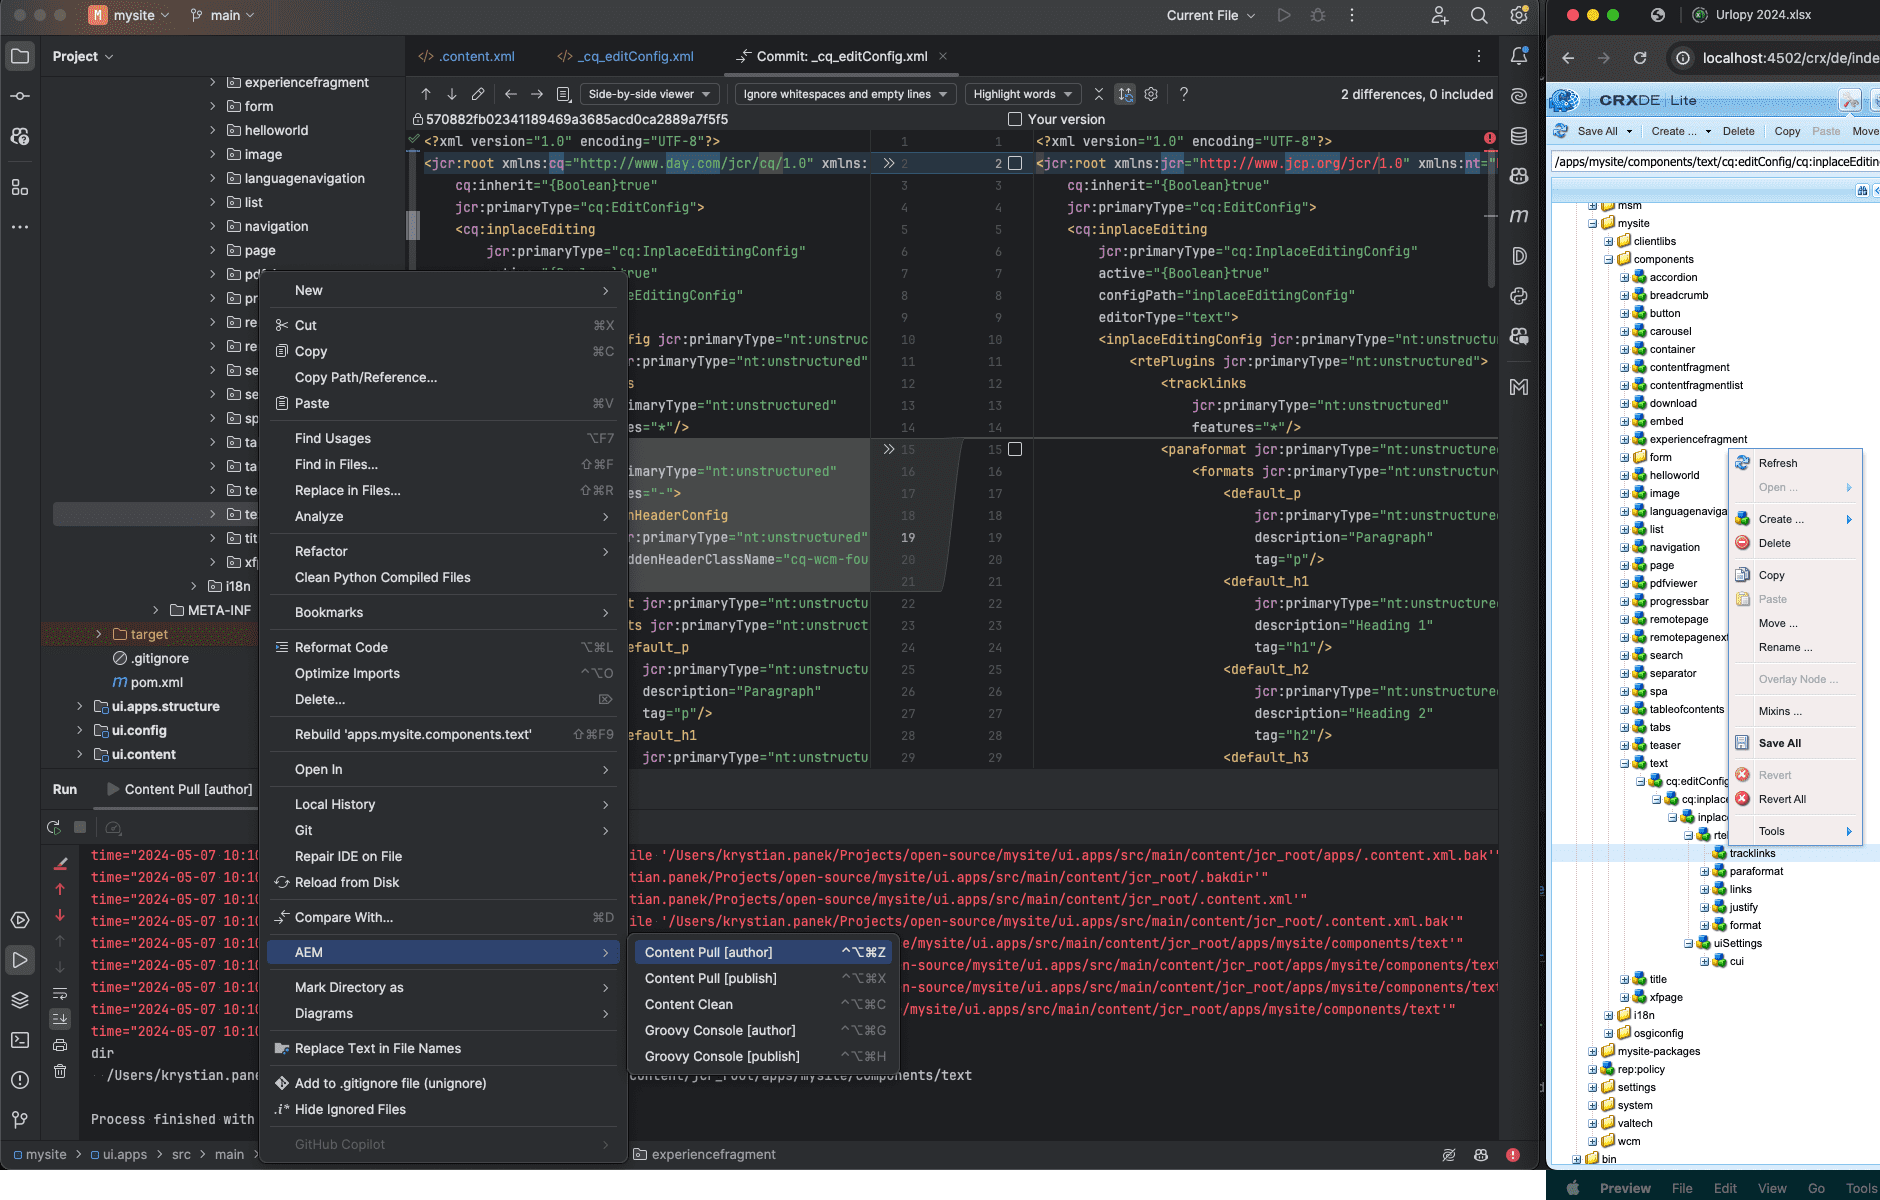
Assigning keyboard shortcuts to these external tools can be particularly useful when a file is open in the editor. These tools can also be executed by right-clicking on the file in the project tree.
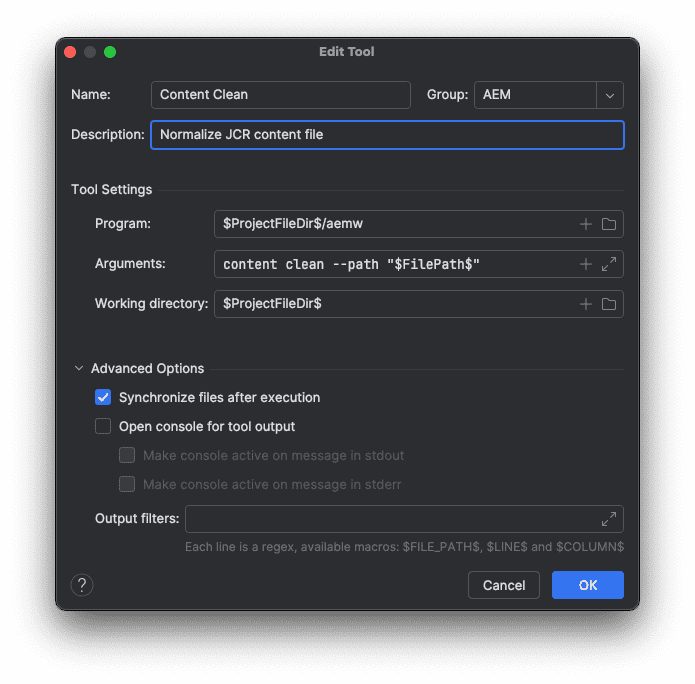
Note that the clean command can also be used standalone to clean up the codebase from unnecessary files and properties:
Furthermore, there are numerous other use cases that we could explore using AEMC commands. For example, we could copy content between instances or trigger replication. Here are a few examples:
sh aemw content copy \
  --instance-url="http://admin:admin@x.x.x.x:4502" \
  --instance-target-url="http://admin:admin@y.y.y.y:4502" \
  --filter-roots="/content/mysite"
sh aemw replication activate -A --path "/content/mysite"
sh aemw replication activate-tree -A --path "/content/mysite"
sh aemw package deploy -A --file "all/target/*.zip"
sh aemw package deploy -P --file "ui.apps/target/*.zip"
Each of these could also be used as an external tool. The sky is the limit.
Executing Groovy Scripts
Groovy scripts are often executed on AEM instances in many AEM projects. These scripts can automate a variety of tasks, including:
- Performing JCR content upgrades, such as migrating AEM components,
- Conducting batch data imports and exports,
- Migrating content between AEM instances, for example, programmatically building JCR packages,
- Cleaning up the repository, such as removing leftovers from deleted components and fixing corrupted AEM pages,
- And much more.
Executing scripts directly on the AEM instance can be cumbersome, particularly when frequent testing is required. The process of copying and pasting scripts into the Groovy Console is far from efficient. Instead, envision a workflow where scripts are executed directly from your preferred IDE whenever needed. Let's explore this alternative approach.
For demonstration purposes, let's consider a simple Groovy script that initiates a workflow on an AEM instance. The script provided below triggers a workflow that regenerates image renditions for a specific asset. This can be particularly useful when you need to verify the functionality of the DAM asset processing workflow after making customization or configuration changes. To initiate the workflow from the AEM GUI, one must navigate to the asset details page, open the timeline, click the somewhat obscure arrow button, locate the workflow, and confirm the dialog. This process involves several steps.
Let's simplify it by introducing a script at the example path: ui.content/src/main/content/jcr_root/var/groovyconsole/scripts/mysite/MYSITE-1_dam-update-asset.groovy:
/**
 * Easily/on-demand regenerate image renditions to check DAM processing workflow implementation and configuration.
 */
import com.day.cq.workflow.WorkflowSession
import com.day.cq.workflow.exec.WorkflowData
import com.day.cq.workflow.WorkflowService

// ===[ Configuration ]===

def WORKFLOW_MODEL = "/var/workflow/models/dam/asset_processing_on_sdk"
def WORKFLOW_DATA = "/content/dam/mysite/asset.jpg"

// ===[ Implementation ]===

def debug(message) {
  println(message)
  log.info(message)
}

def startWorkflow(modelPath, dataPath) {
  debug "Starting workflow instance (data path '$dataPath', model path '$modelPath')"
  WorkflowSession session = getService(WorkflowService.class).getWorkflowSession(session)
  WorkflowData data = session.newWorkflowData('JCR_PATH', dataPath)
  session.startWorkflow(session.getModel(modelPath), data)
  debug "Started workflow instance (data path '$dataPath', model path '$modelPath')"
}

// ===[ Execution ]===

startWorkflow(WORKFLOW_MODEL, WORKFLOW_DATA)
To execute such a script on AEM, we need to add an appropriate runtime to the AEM instances. As of the time this article was written, the optimal method is to install AEM Easy Content Upgrade (AECU). AECU embeds the Groovy runtime and provides a console, hooks, monitoring, and several other potentially useful features.
Assuming that your project is utilizing the AEM Compose tool (as described in a separate post), you could simply install AECU using the command below:
sh aemw package deploy --url "https://github.com/valtech/aem-easy-content-upgrade/releases/download/6.5.0/aecu.complete.cloud-6.5.0.zip"Once you have AECU installed on your AEM instances, we can now define a new task that will help us execute any Groovy Script defined in our codebase directly on the AEM instance using the command line. Executing from the Groovy Console GUI is possible out of the box.
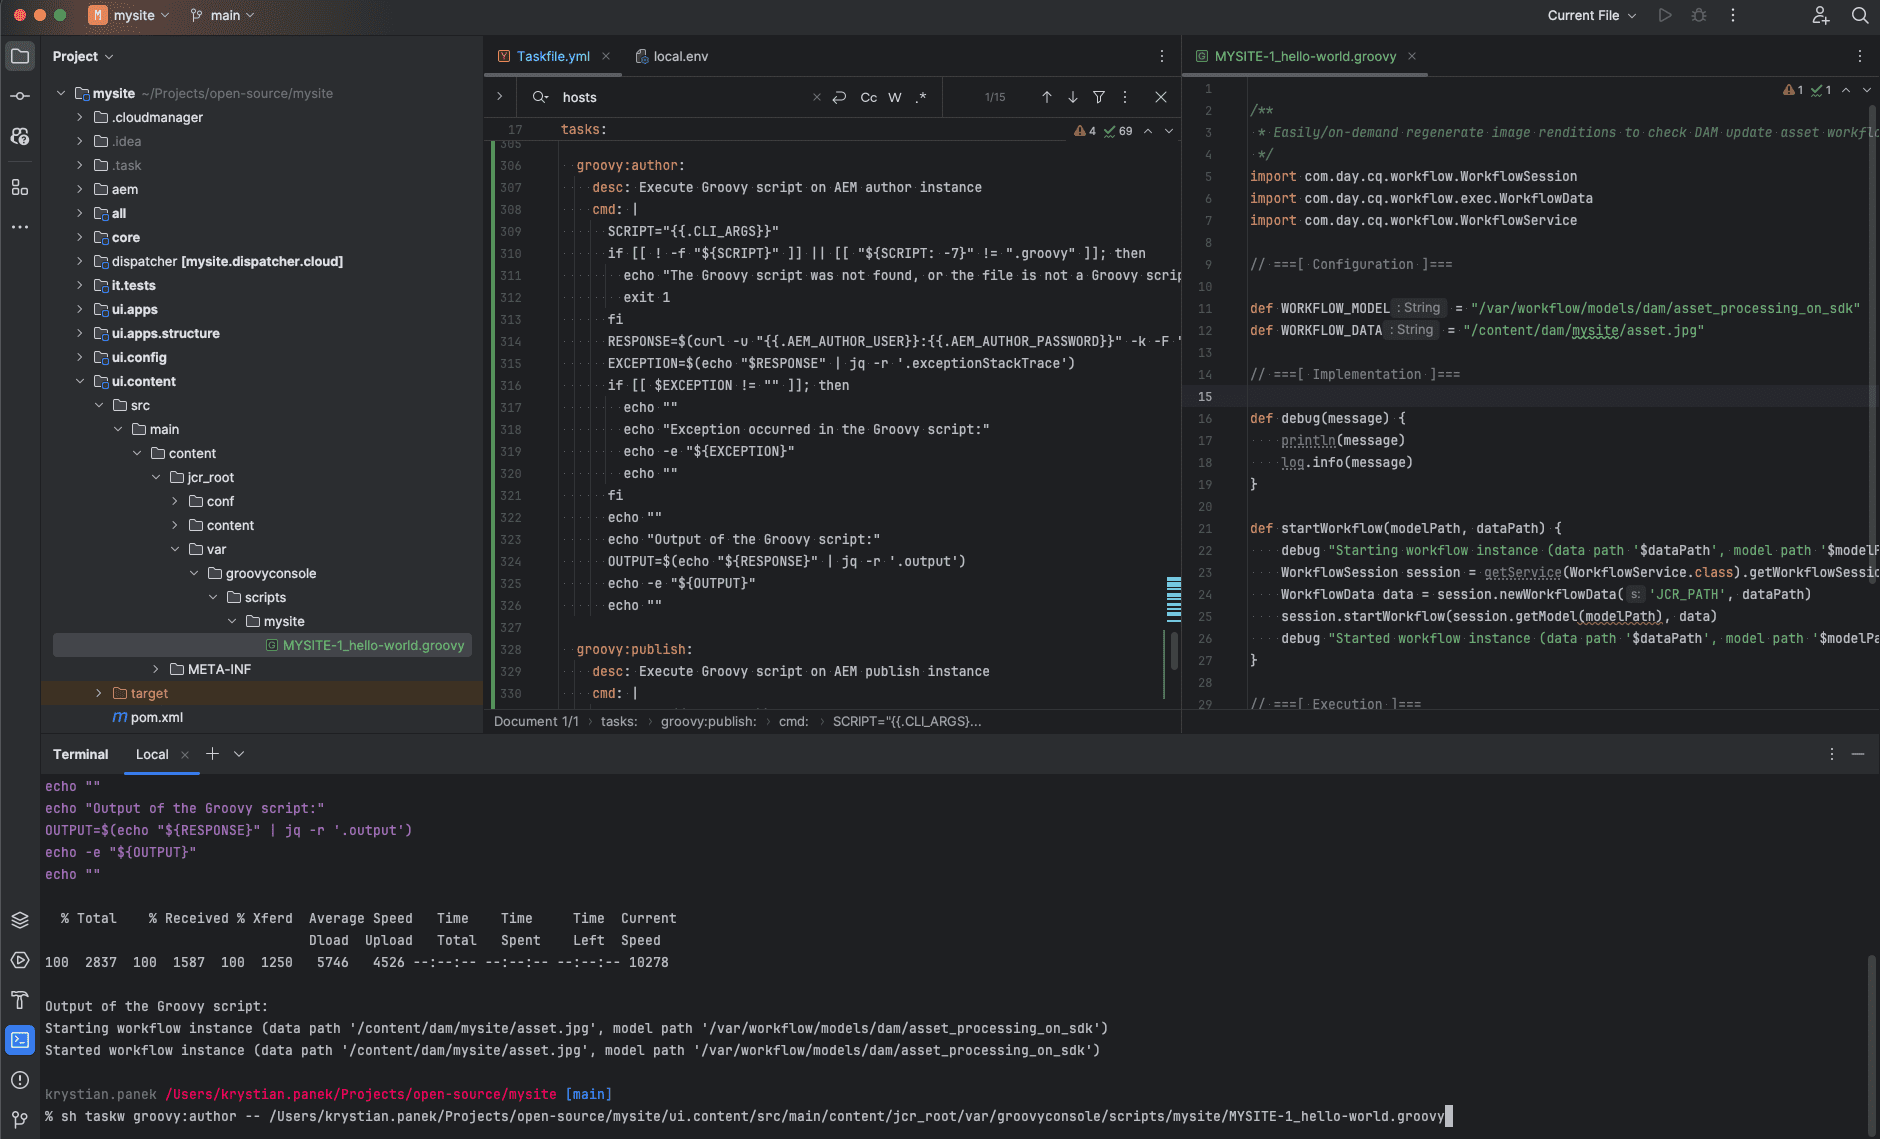
Let's begin by defining a task in the file Taskfile.yml for the AEM author instance:
  groovy:author:
    desc: Execute Groovy script on AEM author instance
    cmd: |
      SCRIPT="{{.CLI_ARGS}}"
      if [[ ! -f "${SCRIPT}" ]] || [[ "${SCRIPT: -7}" != ".groovy" ]]; then
        echo "The Groovy script was not found, or the file is not a Groovy script: '${SCRIPT}'"
        exit 1
      fi
      RESPONSE=$(curl -u "{{.AEM_AUTHOR_USER}}:{{.AEM_AUTHOR_PASSWORD}}" -k -F "script=@${SCRIPT}" -X POST "{{.AEM_AUTHOR_HTTP_URL}}/bin/groovyconsole/post.json")
      EXCEPTION=$(echo "$RESPONSE" | jq -r '.exceptionStackTrace')
      if [[ $EXCEPTION != "" ]]; then
        echo ""
        echo "Exception occurred in the Groovy script:"
        echo -e "${EXCEPTION}"
        echo ""
      fi
      echo ""
      echo "Output of the Groovy script:"
      OUTPUT=$(echo "${RESPONSE}" | jq -r '.output')
      echo -e "${OUTPUT}"
      echo ""
To execute this script, run the following command, adjusting the script path as necessary:
sh taskw groovy:author -- ui.content/src/main/content/jcr_root/var/groovyconsole/scripts/mysite/MYSITE-1_dam-update-asset.groovyNext, let's add another task to work with the AEM publish instance as well, using only other variables.
  groovy:publish:
    desc: Execute Groovy script on AEM publish instance
    cmd: |
      SCRIPT="{{.CLI_ARGS}}"
      if [[ ! -f "${SCRIPT}" ]] || [[ "${SCRIPT: -7}" != ".groovy" ]]; then
        echo "The Groovy script was not found, or the file is not a Groovy script: '${SCRIPT}'"
        exit 1
      fi
      RESPONSE=$(curl -u "{{.AEM_PUBLISH_USER}}:{{.AEM_PUBLISH_PASSWORD}}" -k -F "script=@${SCRIPT}" -X POST "{{.AEM_PUBLISH_HTTP_URL}}/bin/groovyconsole/post.json")
      EXCEPTION=$(echo "$RESPONSE" | jq -r '.exceptionStackTrace')
      if [[ $EXCEPTION != "" ]]; then
        echo ""
        echo "Exception occurred in the Groovy script:"
        echo -e "${EXCEPTION}"
        echo ""
      fi
      echo ""
      echo "Output of the Groovy script:"
      OUTPUT=$(echo "${RESPONSE}" | jq -r '.output')
      echo -e "${OUTPUT}"
      echo ""
To execute this script, run the following command:
sh taskw groovy:publish -- ui.content/src/main/content/jcr_root/var/groovyconsole/scripts/mysite/MYSITE-1_dam-update-asset.groovyThe implementation of the tasks above assumes the use of dotenv variables, which are defined during AEMC project initialization. The trick here is that these variables, such as AEM credentials, are reused and shared between both the Taskfile and AEMC configuration.
The result of running the commands above will be the output of the Groovy script execution on the AEM instance.
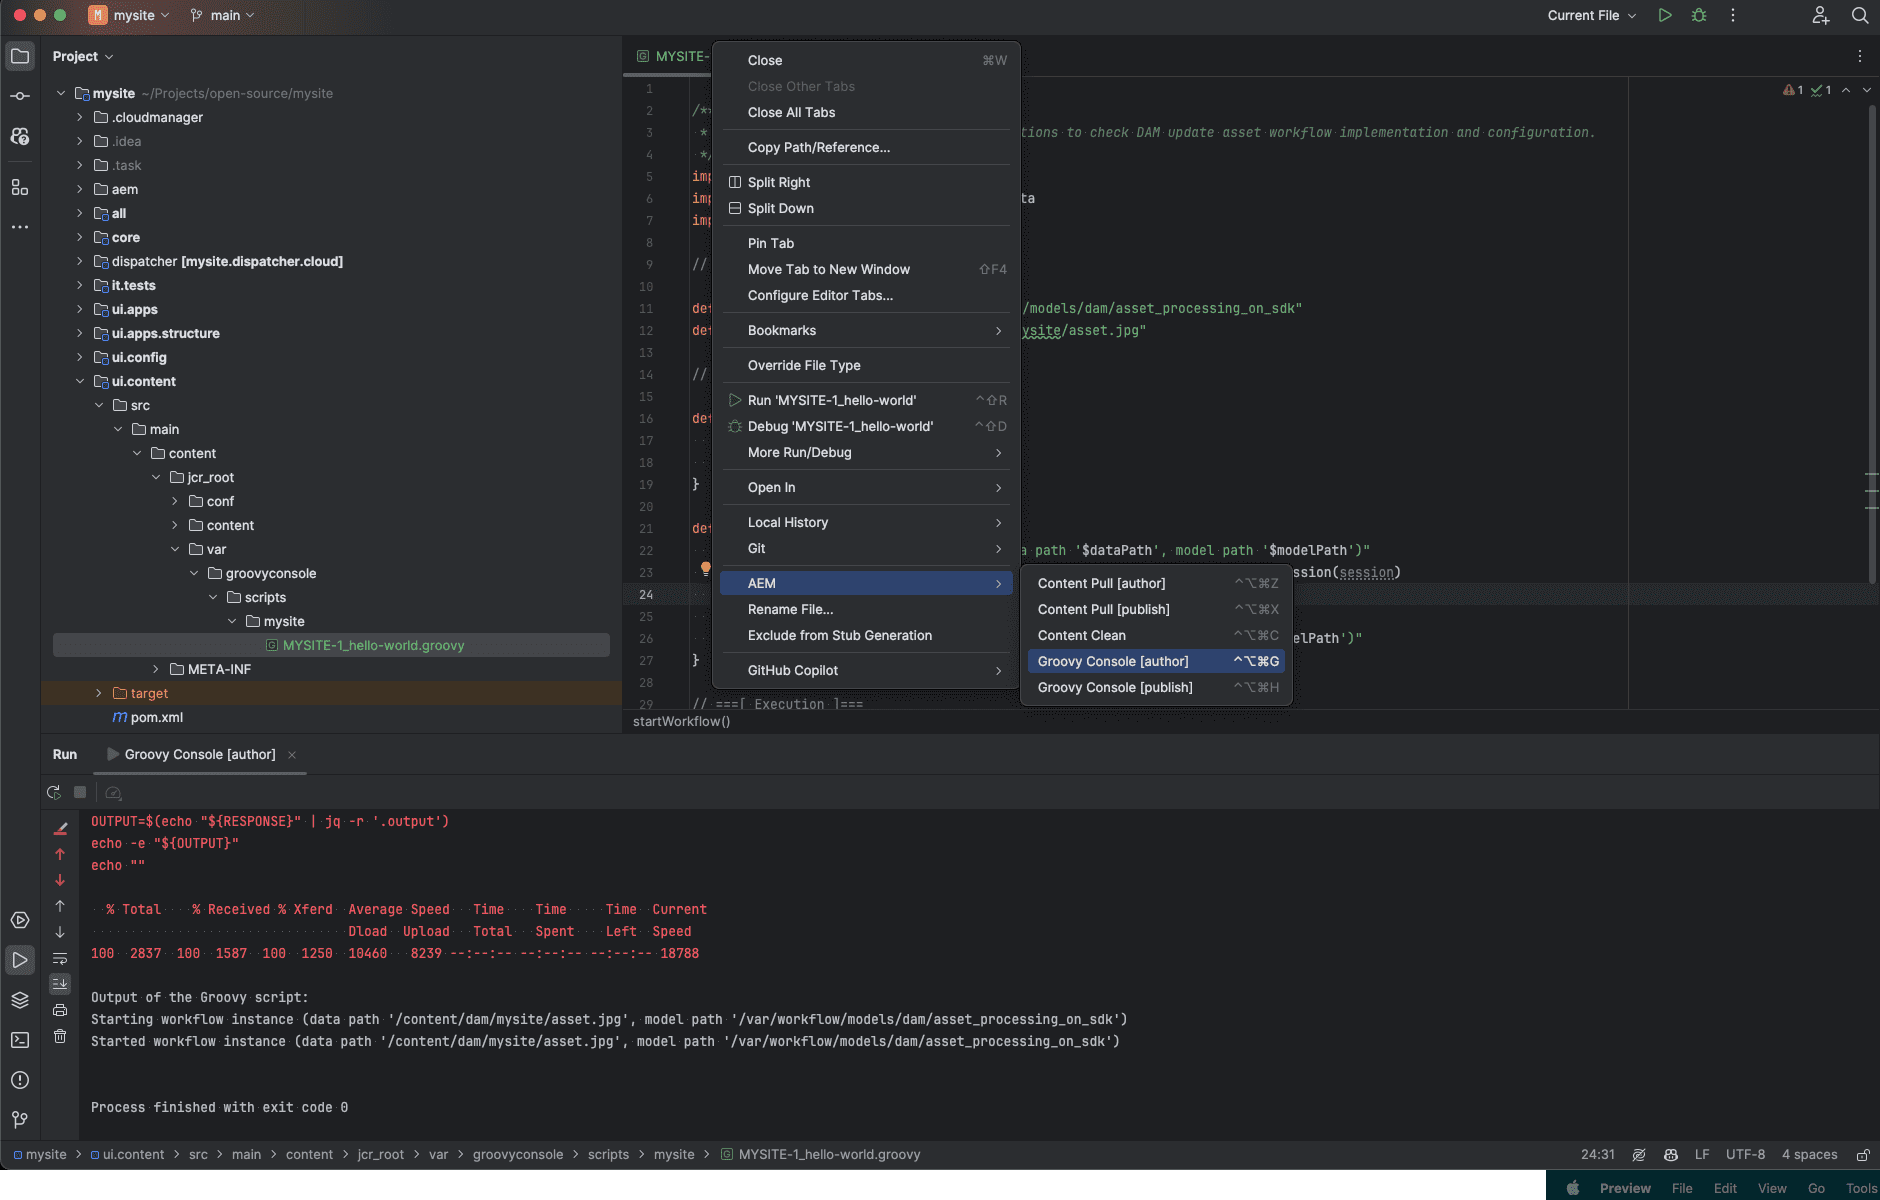
To enhance the developer experience, we could wrap the above commands as external tools in IntelliJ IDEA or any other IDE of your choice, and assign keyboard shortcuts to them.
Finally, they can be made available in the context menu of the Groovy script file in a project tree or in the editor.
Conclusion
The discussed CLI commands, when integrated into any IDE of choice, can significantly boost a developer's productivity.
By leveraging these techniques, an AEM developer can optimize their daily workflow. This strategy enables more efficient work and better focus by eliminating the need for frequent switching between the IDE and the browser for certain tasks on the AEM instance.
In conclusion, always remember:
- For repetitive tasks, consider automating them using Taskfile. This approach not only saves time but also minimizes the risk of human error. It's straightforward to maintain and can be used by everyone on the team.
- There's no need to install or develop your own plugins for your IDE to automate AEM tasks. Instead, you can use CLI tools or bash scripts, which can be integrated into any IDE as external tools.
- If you have a pre-configured AEM Compose in your project, you can leverage it to set up external tools for AEM tasks.
Hero image by iMattSmart, opens in a new window
Featured image by iMattSmart, opens in a new window
