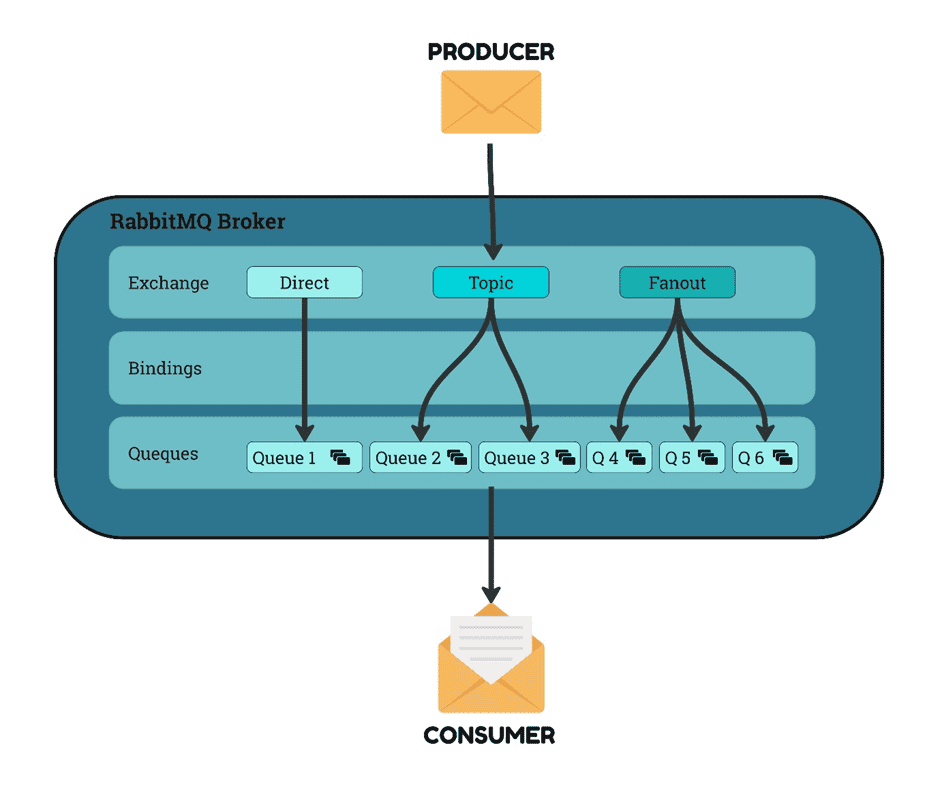
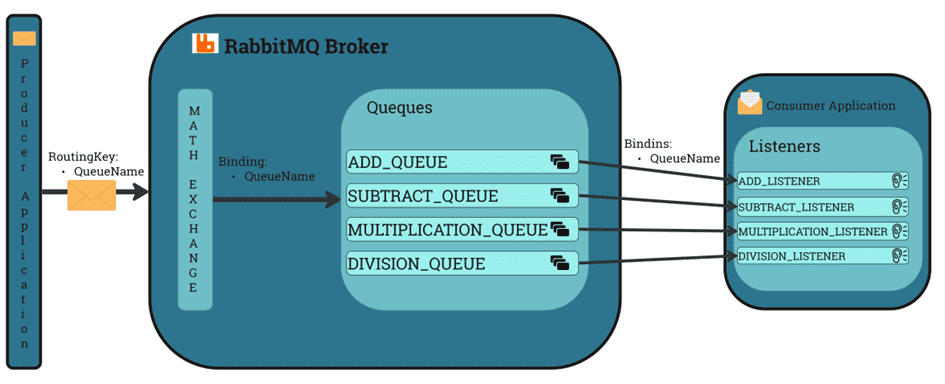
RabbitMQ is a tool helpful to achieve asynchronous communication between microservices. It allows us to manage data routing between services and behaviour during services unavailability.
Introduction
The guide is an introduction to Messages Brokers using RabbitMQ as an example.
In this series of articles, we will cover direct exchange, topic exchange and fanout exchange approaches. This article is divided into a theoretical part and a practical part, in which we will create a simple Java application using RabbitMQ. This will allow you to learn not only the theory but also show the practical use of RabbitMQ.
At Wunderman Thompson Technology, we use RabbitMQ in our Brand Guardian project. It is used to exchange data between services and process it asynchronously. For example, when an asset is sent to the Brand Guardian, it is taken by our Core app, where it is sent to a specific RabbitMQ queue, where it waits to be consumed by the AI service. Thanks to this, we can process assets asynchronously and in chunks, so that our servers don't get clogged up.
Theory overview
RabbitMQ is a popular open-source message broker that provides a robust and flexible platform for asynchronous communication between applications. It enables the exchange of data between different services, making it a crucial component in building scalable and distributed systems. RabbitMQ uses AMQP (Advanced Message Queuing Protocol), which defines the structure of messages, like headers and payload. In this quick guide, we'll explore the key concepts of RabbitMQ and understand how it works as a message broker.
To better understand the topic, we can use an analogy of a postman.
Imagine that you are sending a letter, in the context of RabbitMQ, you are the producer/publisher. This letter can be addressed in various ways (direct, topic, fanout), and the postman represents the exchange that delivers the letters to the recipients mailboxes/queues the person who takes the letter out of the mailbox in RabbitMQ world is a called consumer.
- Message in RabbitMQ consists of two parts: the headers and the body. The headers contain metadata about the message, such as message ID, size, content type, priority, etc. The message body contains the actual content conveyed by the message in binary format.
- Producer (also called publisher) is a service that produces messages and sends them to queues via exchanges.
- Exchanges receive messages from producers and route them by routing key to queues. RabbitMQ provides different exchange types such as direct, topic, fanout, headers, dead letter exchanges, but today we will focus on the direct exchange.
| Exchange name | Description |
|---|---|
| Direct | The direct exchange compares the routing key of the incoming message with the routing keys specified in the bindings. If a match is found between the routing key and the binding, the message is routed to the corresponding queue(s). If multiple queues have the same routing key, the message is delivered to all of them. |
| Fanout | In a fanout exchange, the routing logic is straightforward. It doesn't consider the message's routing key or any pattern matching. It simply forwards the message to all bound queues. |
| Topic | The topic exchange compares the routing key of the incoming message with the binding keys specified in the queue bindings. It uses the following rules: - Each binding key can contain multiple words separated by dots. - Words are matched exactly unless the wildcard characters () or (#) are used. - The "" wildcard matches exactly one word in the routing key. - The "#" wildcard matches zero or more words in the routing key. The topic exchange attempts to find a matching binding key for the routing key. If a match is found, the message is routed to the corresponding queue(s). If multiple queues are bound with the same binding key, the message is delivered to all of them. |
- Bindings define the relationship between exchanges and queues by binding key. They specify the routing rules used to determine which messages should be delivered to which queues
- Queues store messages until they are consumed by subscribers. Consumers retrieve messages from queues and process them.
- Consumers are services that take messages from queues.
Let’s get some practice
Prerequisites
To start working with RabbitMQ we need:
- Installed or running on Docker: RabbitMQ 3.11 with Management plugin
- Java JDK 8 or higher
- Favorite IDE
- Basic Java, Maven & Spring Boot knowledge
All the code examples used in this article are available on GitHub (including docker compose to run configured RabbitMQ)
Project overview
In the guide, we will create two projects that will use Spring Boot 3 and Spring AMQP 2.15.
The goal of the project is to create a service that generates two random numbers and sends them by RabbitMq to another service that will perform mathematical operations on them.
One of the projects is called "publisher". It will contain the RabbitMQ configuration. We will create four queues: ADD, SUBTRACT, MULTIPLY and DIVIDE, an exchange, and bindings for connect the exchange to the queues. This subproject will also include simple logic, a service that will send two random numbers to the specify queues.
The second project is called "consumer" and will take the numbers from the queues and perform mathematical operations on them.
You can find the final code here: GitHub
Direct exchange approach
In this article, we will learn about the Direct Exchange approach. Explanation of the code will be in the comments. We'll start with a configuration class in which we'll create beans through which our queues, bindings and exchanges will be created. All files from below example we can find in the publisher module.
Publisher module
@Configuration
public class RabbitMqDirectConfiguration {
  public final static String ADD_QUEUE_NAME = "ADD_QUEUE";
  public final static String SUBTRACT_QUEUE_NAME = "SUBTRACT_QUEUE";
  public final static String MULTIPLICATION_QUEUE_NAME = "MULTIPLICATION_QUEUE";
  public final static String DIVIDE_QUEUE_NAME = "DIVISION_QUEUE";
  public final static String MATH_EXCHANGE = "MATH_EXCHANGE";

  /**
   * This bean creates a queue with the name ADD_QUEUE_NAME
   * This queue will be used to send all the messages that are related to the addition operation
   * .nonDurable property is set to true, so the queue will not survive a broker restart
   * .autoDelete property is set to true, so the queue will be deleted when
   * there are no more consumers subscribed to it
   * Below additional properties are set to true because we want to
   * create a temporary queue for guide purposes
   */
  @Bean
  Queue queueAdd() {
    return QueueBuilder.nonDurable(ADD_QUEUE_NAME)
      .autoDelete()
      .build();
  }

  /**
   * This bean creates a queue with the name SUBTRACT_QUEUE_NAME
   * This queue will be used to send all the messages that are related to the subtraction operation
   * Like above additional properties are set to create temporary queues
   */
  @Bean
  Queue queueSubtract() {
    return QueueBuilder.nonDurable(SUBTRACT_QUEUE_NAME)
      .autoDelete()
      .build();
  }

  /**
   * This bean creates  a queue with the name MULTIPLICATION_QUEUE_NAME
   * At this queue will be sent all the messages that are related to the multiplication operation
   * Like above additional properties are set to create temporary queues
   */
  @Bean
  Queue queueMultiplication() {
    return QueueBuilder.nonDurable(MULTIPLICATION_QUEUE_NAME)
      .autoDelete()
      .build();
  }

  /**
   * This bean creates  a queue with the name DIVIDE_QUEUE_NAME
   * At this queue will be sent all the messages that are related to the division operation
   * Like above additional properties are set to create temporary queues
   * =
   */
  @Bean
  Queue queueDivide() {
    return QueueBuilder.nonDurable(DIVIDE_QUEUE_NAME)
      .autoDelete()
      .build();
  }

  /**
   * This bean creates  a direct exchange with the name MATH_EXCHANGE
   * This exchange will be used to route messages to the queues
   * autoDelete property is set to true, so the exchange will be deleted when
   * there are no more queues bound to it
   */
  @Bean
  DirectExchange directMathExchange() {
    return ExchangeBuilder.directExchange(MATH_EXCHANGE)
      .autoDelete()
      .build();
  }

  /**
   * This bean creates  a binding between the ADD_QUEUE_NAME queue and the MATH_EXCHANGE exchange
   * The routing key is the same as the queue name
   */
  @Bean
  Binding bindAddQueueToExchange() {
    return BindingBuilder
      .bind(queueAdd())
      .to(directMathExchange())
      .withQueueName();
  }

  /**
   * This bean creates  a binding between the SUBTRACT_QUEUE_NAME queue and the MATH_EXCHANGE exchange
   * The routing key is the same as the queue name
   */
  @Bean
  Binding bindSubtractQueueToExchange() {
    return BindingBuilder
      .bind(queueSubtract())
      .to(directMathExchange())
      .withQueueName();
  }

  /**
   * This bean creates  a binding between the MULTIPLICATION_QUEUE_NAME queue and the MATH_EXCHANGE exchange
   * The routing key is the same as the queue name
   */
  @Bean
  Binding bindMultiplicationQueueToExchange() {
    return BindingBuilder
      .bind(queueMultiplication())
      .to(directMathExchange())
      .withQueueName();
  }

  /**
   * This bean creates  a binding between the DIVIDE_QUEUE_NAME queue and the MATH_EXCHANGE exchange
   * The routing key is the same as the queue name
   */
  @Bean
  Binding bindDivideQueueToExchange() {
    return BindingBuilder
      .bind(queueDivide())
      .to(directMathExchange())
      .withQueueName();
  }
}
As the next step we will take a look at the RandomNumber class. This class represent two random numbers between 1 and
100, the values are randomly assigned during the object creation.
public class RandomNumberPair {

  private static final Random random = new Random();
  private final UUID id;
  private final long x;
  private final long y;

  public RandomNumberPair() {
    id = UUID.randomUUID();
    this.x = random.nextInt(100) + 1;
    this.y = random.nextInt(100) + 1;
  }

  @Override
  public String toString() {
    return "Random Pair number with ID: " + id + " and values X: " + x + ", Y: " + y;
  }

  /** GETTERS */
}
As the next step we will take a look at the DirectService class, which is responsible for the logic of our application
and sending messages.
@Service
public class DirectService {


  private final Scanner scanner;
  private RabbitTemplate rabbitTemplate;

  public DirectService(RabbitTemplate rabbitTemplate) {
    scanner = new Scanner(System.in);
    this.rabbitTemplate = rabbitTemplate;
  }

  /**
   * This method is used to send the pair of random numbers to the RabbitMq.
   * The method will ask the user to enter a number between 1 and 4.
   * If the user enters number betwen 1-4, the program will send the pair of
   * random numbers to the specific queue.
   * If the user enters Q, the program will be terminated.
   * The method start after the Spring application is ready.
   */
  @EventListener(ApplicationReadyEvent.class)
  public void runLogic() {
    System.out.println("Direct Service is running...");
    while (true) {
      System.out.println("Please enter a number between 1 and 4" +
        "to select the operation you want to perform on random numbers: \n" +
        "1-Add, 2-Subtract, 3-Multiply, 4-Divide, Q-Quit");
      String userInput = scanner.nextLine();
      switch (userInput.toUpperCase()) {
        case "1":
          sendToAdd(new RandomNumberPair());
          break;
        case "2":
          sendToSubtract(new RandomNumberPair());
          break;
        case "3":
          sendToMultiplication(new RandomNumberPair());
          break;
        case "4":
          sendToDivide(new RandomNumberPair());
          break;
        case "Q":
          System.out.println("Goodbye! The application is terminated");
          System.exit(0);
        default:
          System.out.println("Invalid input. Please enter a number between 1 and 4.");
          break;
      }
    }
  }

  /**
   * The following method is used to send a pair of random numbers to RabbitMq to perform the add calculation
   * RandomNumberPair is a pair of random numbers which is randomly generated in the class constructor
   * PairNumber is mapped to Json format using JsonParser class
   * The message is sent to RabbitMq using the RabbitTemplate
   * The first parameter is the exchange name, which is the name of the exchange that will handle message
   * If exchange name is empty, the message will be sent to the default exchange
   * The second parameter is the routing key, by this key the message will be routed to the specific queue
   * If the routing key doesn't match any queue, the message will be discarded
   * The third parameter is the new RabbitMq message which have some metadata and the body of the message
   * The Body of the message is the pair of random numbers in Json format transformed to bytes
   */
  public void sendToAdd(RandomNumberPair pairNumbers) {
    System.out.println(String.format("%s is sent to Calculator Service with routing key: %s to add values.",
                       pairNumbers.toString(),
                       RabbitMqDirectConfiguration.ADD_QUEUE_NAME));

    String pairNumberJson = JsonParser.mapToJson(pairNumbers);

    rabbitTemplate.send(RabbitMqDirectConfiguration.MATH_EXCHANGE,
                        RabbitMqDirectConfiguration.ADD_QUEUE_NAME,
                        new Message(pairNumberJson.getBytes()));
  }

  /**
   * The following method is used to send a pair of random numbers
   * to RabbitMq to perform the substract calculation
   * Parameters logic is the same as the previous method
   */
  public void sendToSubtract(RandomNumberPair pairNumbers) {
    System.out.println(String.format("%s is sent to Calculator Service with routing key: %s to subtract values",
                       pairNumbers.toString(),
                       RabbitMqDirectConfiguration.SUBTRACT_QUEUE_NAME));

    String pairNumberJson = JsonParser.mapToJson(pairNumbers);

    rabbitTemplate.send(RabbitMqDirectConfiguration.MATH_EXCHANGE,
                        RabbitMqDirectConfiguration.SUBTRACT_QUEUE_NAME,
                        new Message(pairNumberJson.getBytes()));
  }

  /**
   * The following method is used to send a pair of random numbers
   * to RabbitMq to perform the divide calculation
   * Parameters logic is the same as at the previous method
   */
  public void sendToDivide(RandomNumberPair pairNumbers) {
    System.out.println(String.format("%s is sent to Calculator Service with routing key: %s to divide values.",
                      pairNumbers.toString(),
                      RabbitMqDirectConfiguration.DIVIDE_QUEUE_NAME));

    String pairNumberJson = JsonParser.mapToJson(pairNumbers);

    rabbitTemplate.send(RabbitMqDirectConfiguration.MATH_EXCHANGE,
                        RabbitMqDirectConfiguration.DIVIDE_QUEUE_NAME,
                        new Message(pairNumberJson.getBytes()));
  }

  /**
   * The following method is used to send a pair of random numbers
   * to RabbitMq to perform the multiplicative calculation
   * Parameters logic is the same as at the previous method
   */
  public void sendToMultiplication(RandomNumberPair pairNumbers) {
    System.out.println(String.format("%s is sent to Calculator Service with routing key: %s to multiply values.",
                      pairNumbers.toString(),
                      RabbitMqDirectConfiguration.MULTIPLICATION_QUEUE_NAME));

    String pairNumberJson = JsonParser.mapToJson(pairNumbers);

    rabbitTemplate.send(RabbitMqDirectConfiguration.MATH_EXCHANGE,
                        RabbitMqDirectConfiguration.MULTIPLICATION_QUEUE_NAME,
                        new Message(pairNumberJson.getBytes()));
  }
}
Consumer module
Let's take a look at the RabbitMqListener class, which is used to listen for messages from RabbitMQ and perform the
calculation. All files from the example below can be found in the consumer module.
@Service
class RabbitMqListener {

    private final Calculator calculator;

    public RabbitMqListener(Calculator calculator) {
        this.calculator = calculator;
    }

    @RabbitListener(queues = "ADD_QUEUE")
    public void listenerForNumbersToAdd(Message message) {
      RandomNumberPair pair = JsonParser.mapToObject(new String(message.getBody()), RandomNumberPair.class);
      System.out.println(pair + " provided to Calculator!");
        calculator.add(pair);
    }

    @RabbitListener(queues = "SUBTRACT_QUEUE")
    public void listenerForNumbersToSubtract(Message message) {
        RandomNumberPair pair = JsonParser.mapToObject(new String(message.getBody()), RandomNumberPair.class);
        System.out.println(pair + " provided to Calculator!");
        calculator.subtract(pair);
    }

    @RabbitListener(queues = "DIVISION_QUEUE")
    public void listenerForNumbersToDivision(Message message) {
        RandomNumberPair pair = JsonParser.mapToObject(new String(message.getBody()), RandomNumberPair.class);
        System.out.println(pair + " provided to Calculator!");
        calculator.divide(pair);
    }

    @RabbitListener(queues = "MULTIPLICATION_QUEUE")
    public void listenerForNumbersToMultiplication(Message message) {
        RandomNumberPair pair = JsonParser.mapToObject(new String(message.getBody()), RandomNumberPair.class);
        System.out.println(pair + " provided to Calculator!");
        calculator.multiplication(pair);
    }
}
Let's take a look at the Calculator class, which is responsible for performing the calculation.
@Service
class Calculator {

    void add(final RandomNumberPair pair) {
        System.out.println(pair + " after add = " +
                           Math.addExact(pair.getX(), pair.getY()));
    }

    void subtract(final RandomNumberPair pair) {
        System.out.println(pair + " after subtract = " +
                           Math.subtractExact(pair.getX(), pair.getY()));
    }

    void divide(final RandomNumberPair pair) {
        DecimalFormat decimalFormat = new DecimalFormat("#.00");
        System.out.println(pair + " after divide = " +
                           decimalFormat.format((double) pair.getX() / pair.getY()));
    }

    void multiplication(final RandomNumberPair pair) {
        System.out.println(pair + " after multiplication = " +
                           Math.multiplyExact(pair.getX(), pair.getY()));
    }
}
Let’s see the applications in action.
At first we make sure we have run RabbitMQ on our computer, I recommend using docker-compose.yaml included in this
project on GitHub.
As the second step, run PublisherApplication, for example in your IDE. I'm using IntelliJ.
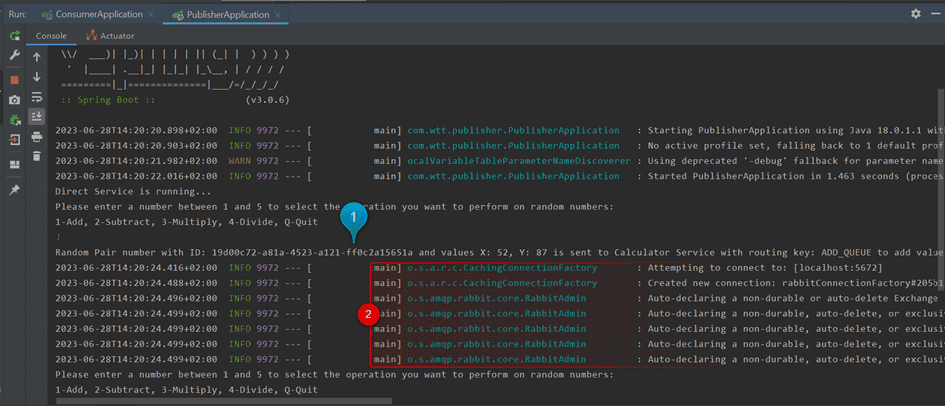
As we can see in the logs below, the connection between our application and RabbitMQ is established when we attempt to send the first message. It is at this point that all the defined queues and exchanges are created. In the screenshot below, we can see:
- id of message with two random number with values X: 52 and Y: 87
- logs about creating queues and exchanges
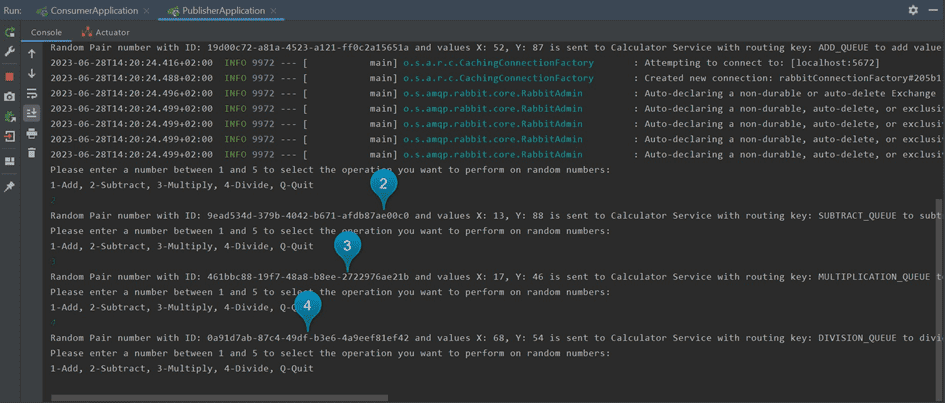
At this moment we will send some more messages to subtract, multiply, divide
- id of message with two random number with values X: 13 and Y: 88
- id of message with two random number with values X: 17 and Y: 46
- id of message with two random number with values X: 68 and Y: 54
After that step we can run ConsumerApplication (if we run application before queues creation, application will throw
exception about Queue not found). In real life cases, RabbitMQ is used in Docker or Kubernetes, where some orchestrator
takes care of running applications in a correct order.
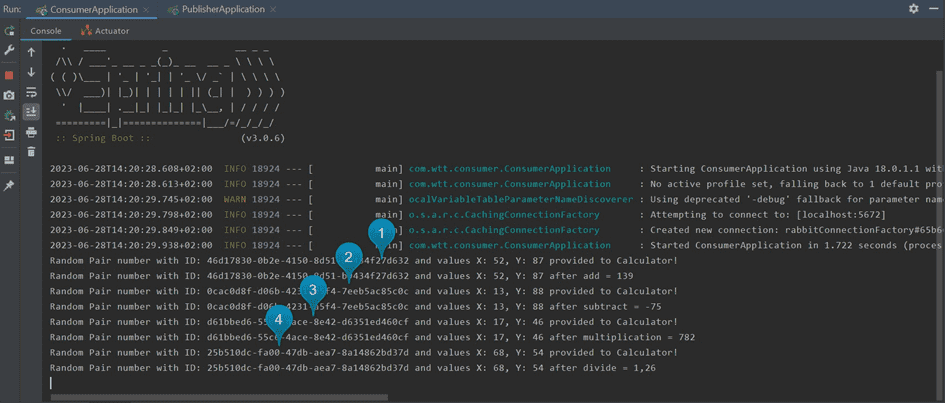
Right now, we'll check the ConsumerApplication logs, where we can found logs about the retrieval of all messages from
the above example with all calculation.
- id of message with two random number with values X: 52 and Y: 87
- id of message with two random number with values X: 13 and Y: 88
- id of message with two random number with values X: 17 and Y: 46
- id of message with two random number with values X: 68 and Y: 54
As we can see in above logs, we created small system consisting of three services: PublisherApplication, RabbitMQ and ConsumerApplication. After creating some random numbers in PublisherApplication, we send them through RabbitMQ to a specific Queue by binded exchange. The ConsumerApplication is waiting for some messages to consume and process it.
RabbitMQ management panel.
After running RabbitMQ, we can check the RabbitMQ Management panel on http://localhost:15672/. The default login and password is guest
In RabbitMQ Management panel we can manage all queues, exchanges, bindings and messages. We can also check there some statistics like messages per second, messages per queue, messages per exchange, etc.
To log in to the RabbitMQ Management panel we have to open http://localhost:15672/ in our browser and use the default login and password (guest/guest)
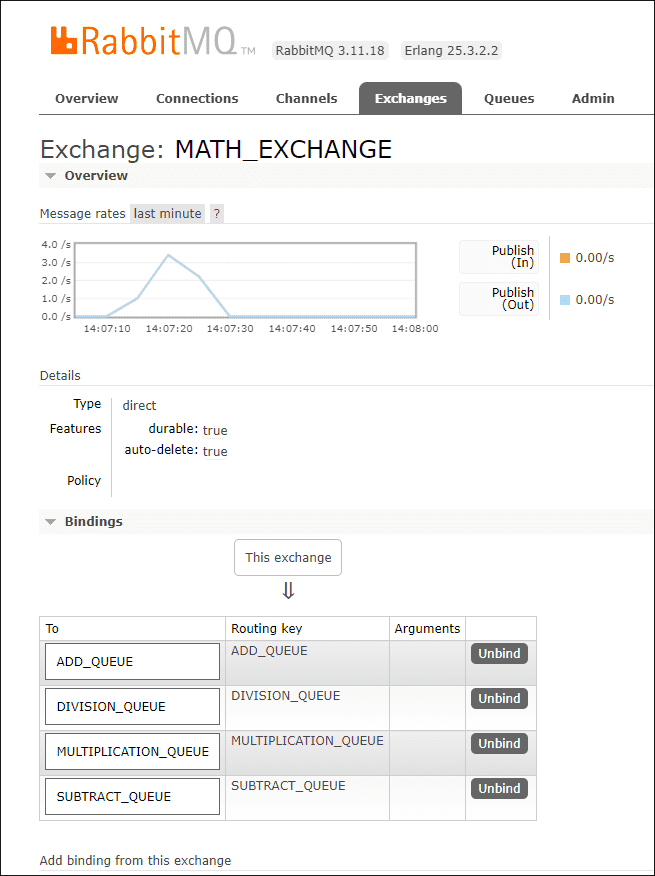
After login, we can see all RabbitMQ management tabs that display all statistic about our RabbitMQ instance and manage it. In the image below, we can see our MATH_EXCHANGE and all queues bound to this exchange. We can also see a chart with statistic about messages per second.
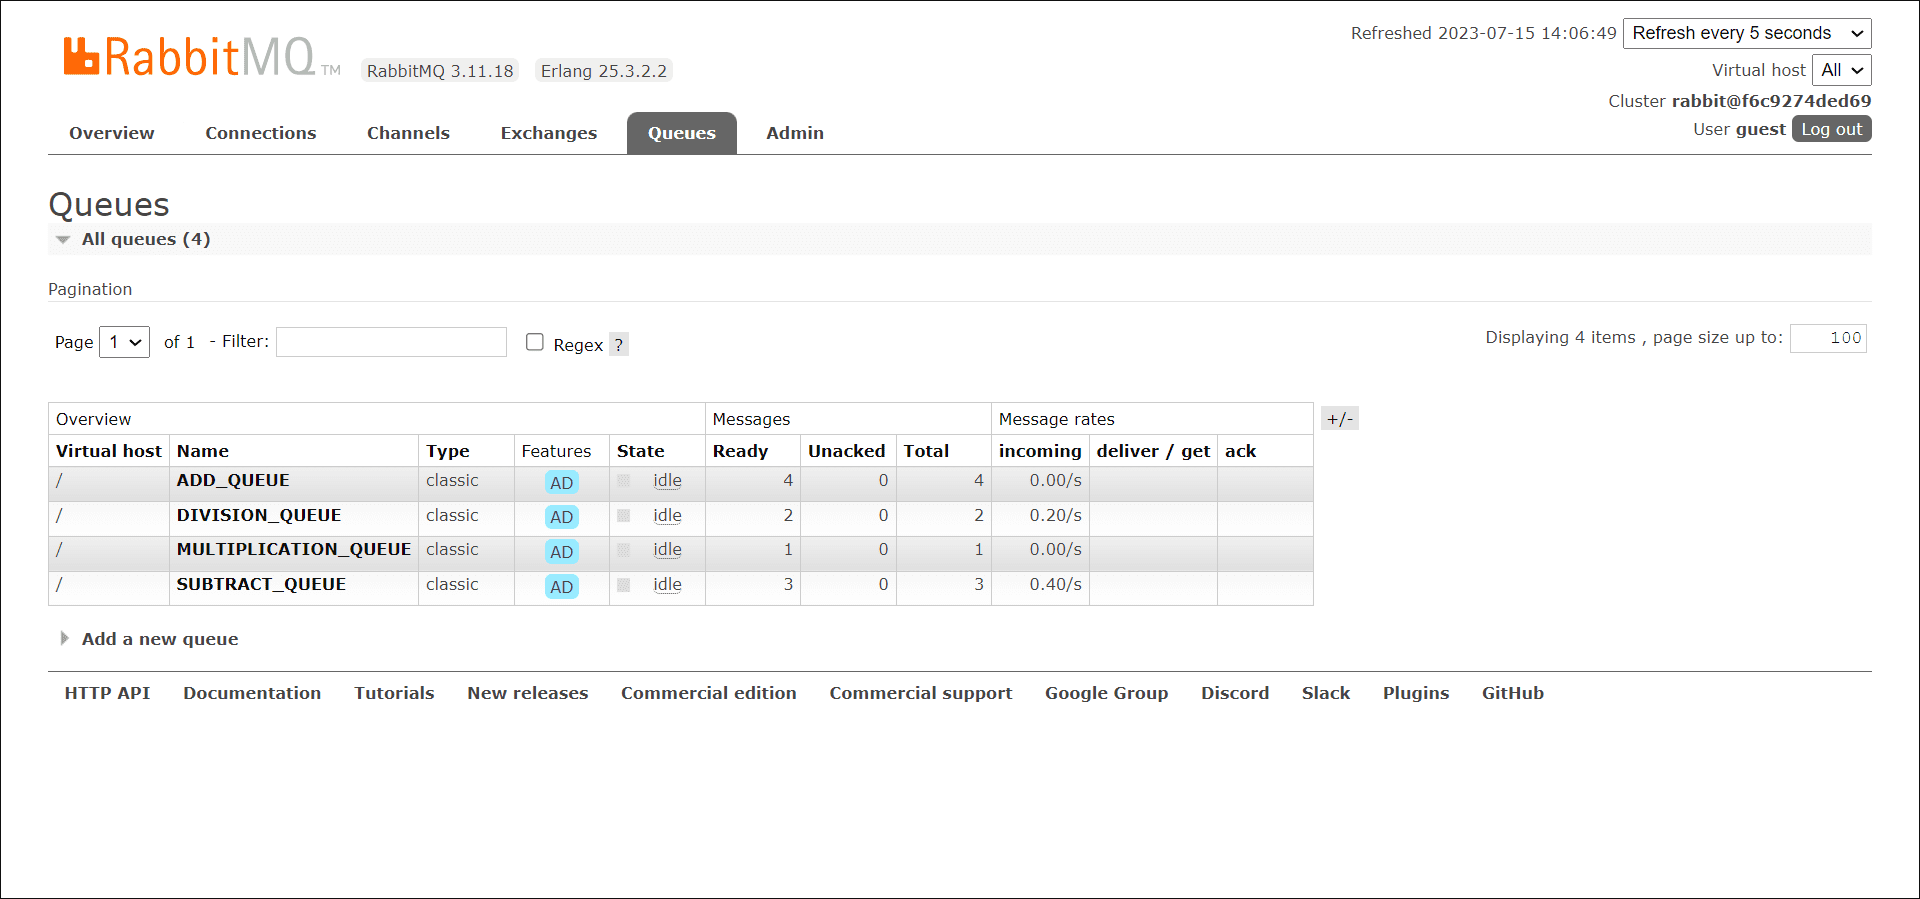
In the image below, we can see all queues and statistic about the messages in each queue.
Summary
I hope this article was helpful and brought the subject of the RabbitMQ closer. Some more information and details about RabbitMQ can be found on the official RabbitMQ website. In the next article, we will cover another couple of exchange approaches, namely Fanout and Topic exchange.
Hero image by Artur Shamsutdinov on Unsplash, opens in a new window
