Image resizing or format conversion is a relatively easy task when doing renditions in AEM. Your project might require more robust approaches supported by intelligent image services. You might need to change images to greyscale, or intelligently crop the image around faces. In this article, I will show you that with AEM as a Cloud service a new Adobe offering, it's a relatively easy task to accomplish.
At the beginning of 2020, Adobe announced a cloud version of the Experience Manager. There are plenty of new things in the cloud version, but what I want to focus on in this post is the way assets are handled. Since early versions of AEM, asset rendition generation was done inside AEM workflows. It consumed a lot of time and system resources, especially when you have plenty of assets. In the cloud version of the AEM, it was rebuilt from scratch, and the asset binary processing is now happening outside AEM within the microservices which are part of the AEM as Cloud service offering.
TL;DR
If you'd like to see the outcome, here is a video showing custom renditions in action. You will see three new renditions generated:
- The image is cropped to 300 x 300 px square around the recognized faces. If faces were not detected, then around the busy area.
- The second one is similar, but additionally has applied an ellipse mask around the cropped area.
- The last one is based on the same rules as the first one but also adds a text overlay.
How AEM as Cloud assets works
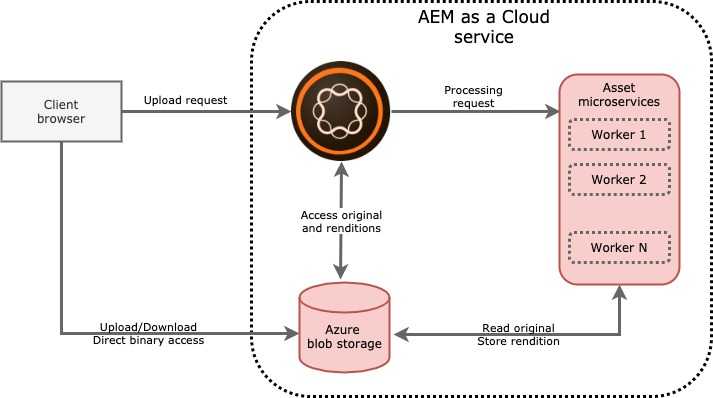
To cut a long story short, as I mentioned at the beginning, asset binaries are no longer processed by the AEM instance. AEM only coordinates access to the Azure Blob storage where binaries are stored. At a high level, it works like below.
The most exciting part is the Asset microservices box. Those services are driven by Adobe's service called Asset Compute. It's a solution built on top of Adobe IO Runtime (The Apache OpenWhisk based function as a service solution). The aim of this service is to:
- Perform any kind of asset binary transformation, such as: resizing, cropping, intelligent cropping, colours manipulation or anything else you can imagine
- An image transformation is driven by the Adobe's internal services for image manipulation or by 3rd-party services in case of custom implementation.
- Store the result of the processing back to AEM as an asset rendition.
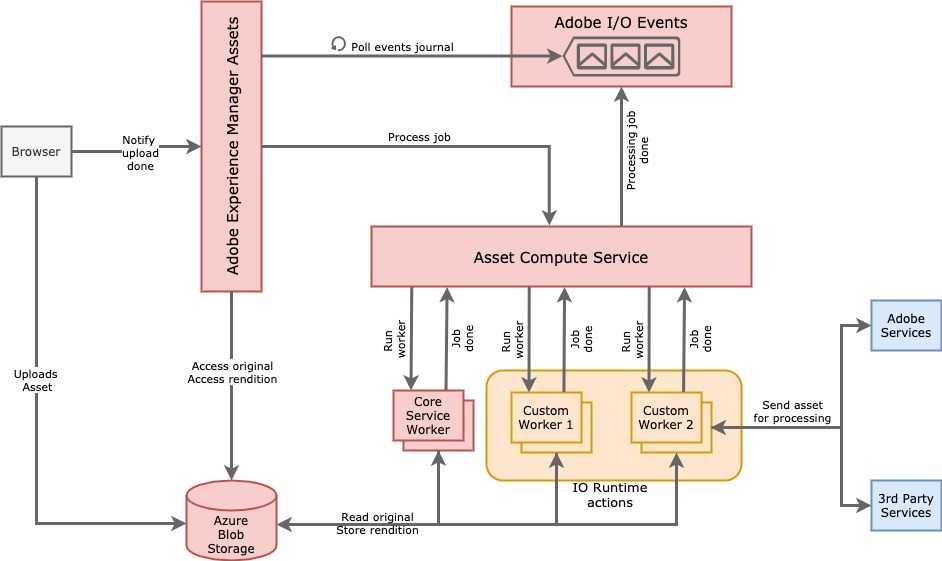
Before going into the code, let me explain in more detail how things work in the diagram below.
-
Once an asset is uploaded, AEM sends a processing job to the Asset Compute service.
- A job carries information such as the location of the source asset (on azure blob storage), desired rendition format (png, jpg, etc.), rendition sizes and/or quality, etc.
- Optionally, the job can hold extra parameters defined on AEM if a custom worker is used.
-
Asset Compute service immediately returns the job ID back to the AEM and dispatches the job among available workers:
- As you can see from the diagram, workers can be Adobe built-in workers or a custom worker, this is the thing we're about to build in this article.
- When the worker is invoked, it usually downloads the source asset from the binary cloud storage and either forwards it to the third-party service for processing or does the image processing itself.
- Once the worker's job is done, it uploads the result back to the binary cloud storage and notifies Asset Compute service it's done.
- Asset Compute service generates an asynchronous event via the "Adobe I/O Events" service and the processing flow finishes.
- Because of the asynchronous nature of the processing (AEM doesn't block itself waiting for a result), AEM has to periodically poll the IO Events service for a given job ID to get its status.
- If the IO Events journal returns that the job is finished, AEM updates a JCR representation of the asset with the info about the generated renditions (links internally the JCR rendition node to the binary cloud storage where the rendition binary sits)
What you need to build it.
You will see in the subsequent sections it's relatively straightforward but requires a couple of steps to prepare your environment and configurations of Adobe services.
Most importantly, you must have an Adobe organization ID, and have access to Adobe Experience Cloud. As a part of that organization, you must have access to AEM as a Cloud service and Adobe IO Runtime. Additionally, your organization must be onboarded to the Adobe Project Firefly. If you don't, you can still join the prerelease programme, for details see How to Get Access to Project Firefly.
Additionally, for the sake of our solution, you need a couple of supporting services:
- Azure blob storage, so an Azure subscription is required (Azure free account is enough)
- An account on imgIX service. You can sign up to imgIX for free to try it.
What we will build
We're going to build a custom worker for Asset Compute service that will produce renditions using the imgIX service.
imgIX is an immensely powerful image processing service that is composed of three layers:
- imgIX CDN to cache and deliver rendered images
- imgIX rendering cluster where all the magic happens
- The source which is the place where your source images are hosted, and from where a rendering cluster initially pulls the image. In our case, it will be Azure blob storage.
The service architecture suggests that it's mainly built to provide a layer delivering transformed and optimized assets directly to your website (via the dedicated domain). However, for the sake of this article, we will use it differently - our worker will fetch the rendered images from imgIX and transfer it to the AEM storage, instead of serving them directly from imgIX CDN on the website.
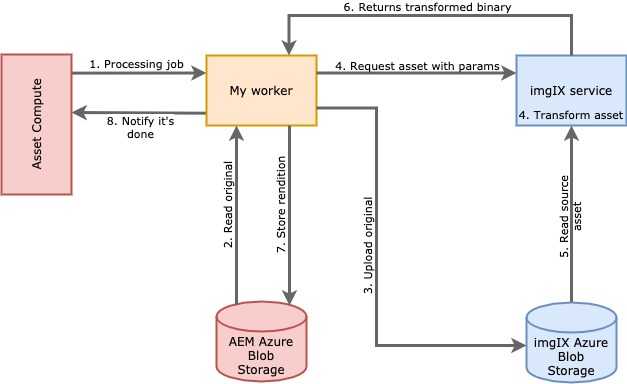
A conceptual diagram of data flow for our solution looks like below.
- On each processing job, our worker first transfers the source image from AEM binaries cloud storage to the Azure blob storage being a source of assets at imgIX.
- Once it's done, the worker generates a URL to the imgIX. The URL holds the parameters on how to transform the image. These parameters come from the processing job and are provided by the AEM user while configuring what renditions to generate.
- The last thing it does is downloading the asset from the generated URL and uploading it back to the AEM binaries cloud storage.
Let's setup all the things
First, we need to setup our services that we will be using.
Azure blob storages
You need to create Azure blob storage on your Azure account. Then, create two containers:
- First, name it
imgix- it will be used as assets source for the imgIX service. - The second one, name it
source- it will be required only for local testing purposes to simulate AEM assets cloud storage.
imgIX
On your imgIX account, you need to create a source pointing to the Azure blob storage.
- During the setup, you define the name of the imgIX subdomain serving transformed images. Write down that domain as we will need it later.
- In the Security section check Secure URLs checkbox
- Once the source provisioning is finished, you need to open it and click on the Show Token button in the Security section. Write down that token as we will need it later.
To test your configuration:
- Upload any asset to the
imgixblob storage container, e.g.image.png - Go to the https://dashboard.imgix.com/tools and sign image URL (use the URL
https://<your-subdomain>.imgix.net/image.png) - Open signed URL in the browser to verify the image is loaded.
Adobe services
- Go to the https://console.adobe.io and create a new project using Firefly template.
-
Add the following services to your project workspace:
- Asset Compute
- I/O Management API
- I/O Events
- When adding the first service, you will be asked to generate keys pair or upload your own. Pick Generate keys pair and your keys will be downloaded as a zip file.
- Unzip the file and write down the location to the private.key.
Setup your local environment
To run anything from your local machine, you only need NodeJS (v10 to v12 LTS).
Install the AIO Command-line interface and sign in to Adobe account from the CLI. An Adobe login page will open in your browser to login using your credentials.
$> npm install -g @adobe/aio-cli
$> aio login
Finally, let's code the worker.
A lot of preparation so far, but now we finally write some code.
- Create a new application using AIO CLI
$> aio app init my-custom-worker- You will be asked to select your Adobe Organization, followed by the console project selection (pick the one you created in previous steps) and finally choose a project workspace where you added all the required services.
- Next, you need to pick the components of the app. Select only Actions: Deploy Runtime action.
- On the type of action, choose only: Adobe Asset Compute worker.
- Provide the name of the worker and wait for the
npmto finish installing all the dependencies.
Once it's done, edit .env file and add the following lines. These are the environment variables the AIO CLI uses. In a
production deployment, you can set them directly on your CI/CD pipelines as environment variables.
## A path to the private.key you obtained from Adobe Console
ASSET_COMPUTE_PRIVATE_KEY_FILE_PATH=/path/to/the/private.key

## Azure blob storage container you created to simulate AEM binaries cloud storage
AZURE_STORAGE_ACCOUNT=your-storage-account
AZURE_STORAGE_KEY=your-storage-key
AZURE_STORAGE_CONTAINER_NAME=source

# Azure blob storage container used by the imgIX as assets source
IMGIX_STORAGE_ACCOUNT=your-storage-account
IMGIX_STORAGE_KEY=your-storage-key
IMGIX_STORAGE_CONTAINER_NAME=imgix

# A security token you obtained when setting up imgIX source
IMGIX_SECURE_TOKEN=imgx-token
# A imgix domain you defined when setting up imgIX source
IMGIX_DOMAIN=your-subdomain.imgix.net
Edit manifest.yml file and add inputs object, as shown below. This file describes IO Runtime action to be deployed.
And input param sets the default parameters with values referenced to our environment variables. Those params are
available in action JS as param object.
packages:
  __APP_PACKAGE__:
    license: Apache-2.0
    actions:
      czeczek-worker:
        function: actions/custom-worker/index.js
        web: 'yes'
        runtime: 'nodejs:12'
        limits:
          concurrency: 10
        inputs:
          imgixStorageAccount: $IMGIX_STORAGE_ACCOUNT
          imgixStorageKey: $IMGIX_STORAGE_KEY
          imgixStorageContainerName: $IMGIX_STORAGE_CONTAINER_NAME
          imgixSecureToken: $IMGIX_SECURE_TOKEN
          imgixDomain: $IMGIX_DOMAIN
        annotations:
          require-adobe-auth: true
We also need to add two dependencies to our project. These are the libraries we will use to simplify access to the Azure blob storage and to generated signed URL for imgIX.
$> npm install @adobe/aio-lib-files imgix-core-jsFinally, edit the worker source code (located under my-custom-worker/actions/<worker-name>/index.js) and replace it
with the following code.
'use strict';

const { worker } = require('@adobe/asset-compute-sdk');
//Convinient library provided by adobe that abstract away managing files on cloud storages
const filesLib = require('@adobe/aio-lib-files');
const { downloadFile } = require('@adobe/httptransfer');
const ImgixClient = require('imgix-core-js');

exports.main = worker(async (source, rendition, params) => {
  //Initialize blob storage client used by imgix
  //We're reading the parameters we defined in manifest.yml
  const targetStorage = await filesLib.init({
    azure: {
      storageAccount: params.imgixStorageAccount,
      storageAccessKey: params.imgixStorageKey,
      containerName: params.imgixStorageContainerName,
    },
  });
  //Copy source asset from the AEM binaries storage to the Azure blob storage for imgIX
  // localSrc:true means, the first parameters points to the file in the local file system (asset-compute-sdk abstracts the source blob storage so it's visible as local file)
  // Second arguments defines the path on the target blob storage. We use the same path just to simplify things
  await targetStorage.copy(source.path, source.path, { localSrc: true });

  //Initialize imgix client responsible for generation of signed URLs
  //to our assets accessed via imgIX subdomain
  //We're getting the config params we defined in manifest.yml
  const client = new ImgixClient({
    domain: params.imgixDomain,
    secureURLToken: params.imgixSecureToken,
  });

  //Generate signed URL with the params send by AEM and sign it.
  //All the parameters send by AEM are available under rendition.instructions object
  const url = client.buildURL(source.path, JSON.parse(rendition.instructions.imgix));

  //Finally, download a rendition from a given url and store in AEM azure blob storage so it will be visible in AEM as a rendition
  await downloadFile(url, rendition.path);
});
Let's run our worker
Just run the following command.
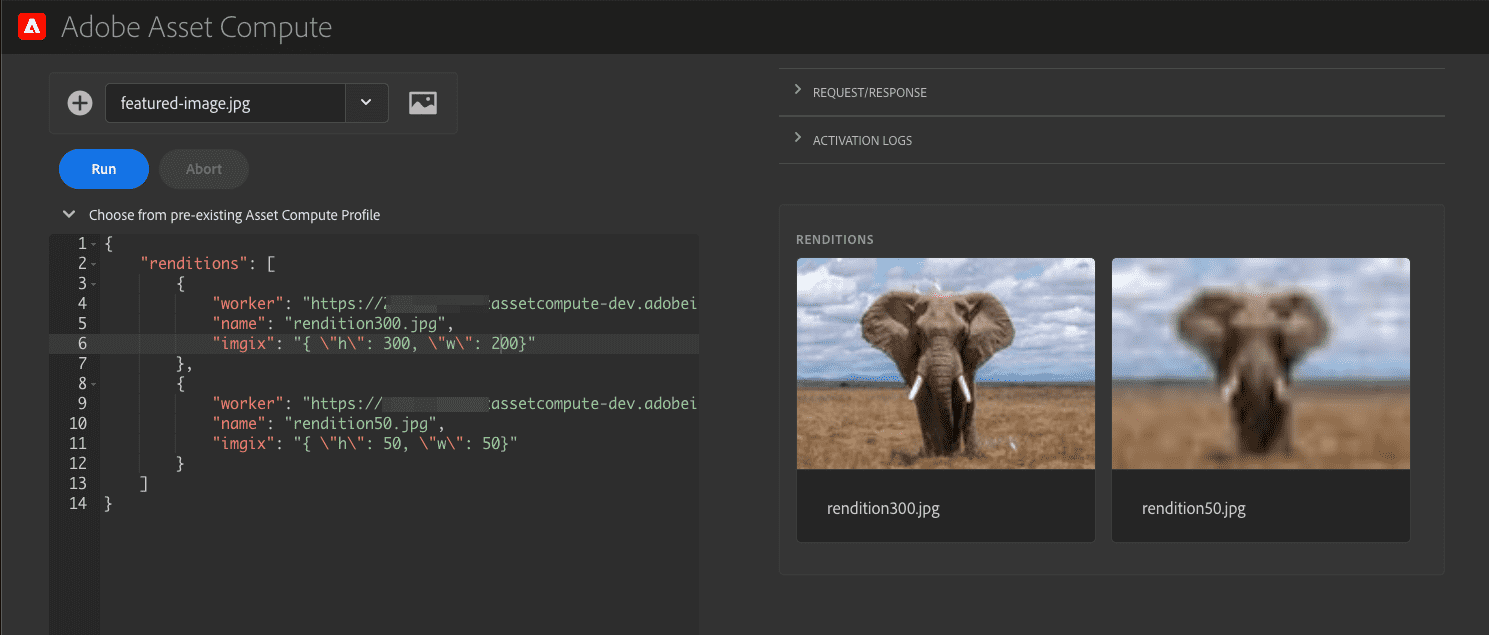
$> aio app runAfter a couple of seconds, it will open Asset Compute Devtool in your browser. Within that tool, you can test your worker without the AEM.
Since our worker requires imgix parameter (as you can see at line 34 in the worker code), you need to provide it in
the worker request object as shown on the screenshot. That parameter must be an escaped JSON. For instance, use the
below parameter to just resize an image to 300x300px.
"imgix": "{ \"h\": 300, \"w\": 300}"Then you run your worker and observe results on the right-hand side of the Asset Compute Devtool.
To let AEM use our worker, deploy the app by running the command.
$> aio app deployAs a result of that command, you will get the URL of your worker, similar to the below. Write down that URL as we need to put it in AEM configuration.
Your deployed actions:
  -> MyAssetCompute-0.0.1/__secured_my-worker
  -> https://99999-myassetcompute-dev.adobeioruntime.net/api/v1/web/MyAssetCompute-0.0.1/my-worker
Well done, your app is now online 🏄
AEM
- Go to your AEM cloud instance and open Tools -> Assets -> Processing Profiles
- Create a new processing profile, e.g.
My Worker test profile - Go to the Custom tab and configure your renditions using your worker, as shown below.
I configured 3 renditions using following imgix configuration params (we don't need to escape JSON if it's used in AEM)
- Crop an image to 300x300 px around faces if detected, or around busy sections of the image (entropy).
{
  "fit": "crop",
  "crop": "faces,entropy",
  "w": 300,
  "h": 300
}- Same as the previous, but additionally apply an ellipse mask around the cropped area.
{
  "fit": "crop",
  "crop": "faces,entropy",
  "w": 300,
  "h": 300,
  "fm": "png",
  "mask": "ellipse"
}- The last one is similar to the first, but this time we add a text watermark to the image.
{
  "h": 300,
  "w": 300,
  "fit": "crop",
  "crop": "faces,entropy",
  "mark": "https://assets.imgix.net/~text?w=200&txt-color=fff&txt=Hello+world&txt-size=16&txt-lead=0&txt-pad=15&bg=80002228&txt-font=Avenir-Heavy"
}
As the last step, you need to apply the profile to DAM folder.
Now you can upload images to the folder and observe results on the asset details page.
 Photo by
LinkedIn
Sales Navigator on
Unsplash
Summary
AEM on-prem installations still require workflows to handle the generation of renditions, it's not complicated to build a similar integration based on the workflow processes. However, you will quickly face scalability and performance issues. The cloud approach to image renditions seems to be the right step forward and being aligned with the current cloud-native trends.
Despite the fact, there were a lot of things to configure/setup it's still a relatively straightforward process and more importantly, it's once-off in most of the cases. The action code itself, it's simple and easy to digest thanks to the SDKs or libraries Adobe provides. The only thing that's not touched in this article is the performance of the worker itself. It's worth exploring how efficiently it can handle the production volume of the assets and the large size assets. So, I think it's an excellent idea for the next article.
Further reading
Hero image by starline - www.freepik.com, opens in a new window
Featured image by starline - www.freepik.com, opens in a new window


