This is a guide on how to create a custom extension for Adobe Photoshop and other Adobe Creative Cloud tools
The goal of this article is to be a small window into the world of creating custom Photoshop extensions. After reading this post, I hope you will get enough knowledge to bend Photoshop to your will to achieve something which is outside of the default behaviour of an Adobe product.
This article is split into two main parts. In the first part, you will learn all the basic stuff that is required for you to start working on a new custom extension. In the second part, you will get more advanced knowledge such as debugging and integrating custom extension with Adobe Tools API.
Prerequisites
Adobe Photoshop CC installed and basic knowledge of HTML, CSS, and JavaScript.
Part 1
Technical overview
To create an extension for Adobe applications such as Photoshop you need to use CEP. CEP stands for Common
Extensibility Platform and it's a framework that unified the way in which developers can create custom extensions for
most Adobe tools available. At the time of writing of this article, CEP supports 13 of them - Photoshop, InDesign,
InCopy, Illustrator, Premiere Pro, Prelude, After Effects, Animate (Flash Pro), Audition, Dreamweaver,
Muse, Bridge, Rush.
Since CEP 5 which was released in 2014, CEP was totally rebuilt to support web technologies. It means that you can build UI for extensions in HTML and style it in CSS. And of course, all logic that you need can be written in JavaScript and Node.js. It is because each panel uses an embedded instance of Chromium (CEF) which is no different from a standard desktop browser. Thanks to that you can use all custom JS frameworks such as React, Vue, and so forth, to create dynamic UI for our extension. The only difference between an instance of Chromium embedded in a panel and a normal browser is the version of it. So, if you are using a modern JavaScript framework it is important to use Babel. To make things easier, each panel has access to Node.js even if the user does not have it installed locally on his machine.
At the time of writing this article, CEP 9 is the newest version and it has Chromium version 61.0.3163.91 and
Node.js version 8.6.0.
Extension code does not have access to the low-level API of host tools such as Photoshop. All scripts which need to
access tool API are written in ExtendScript files. ExtendScript is a special scripting language created by Adobe
to extend all of its applications. It implements the dialect of ECMAScript 3 standard therefore it is very easy to
learn to someone with even basic JavaScript knowledge. ExtendScript uses the .jsx extension for scripts.
Communication between an extension and an Adobe Tool is handled by a special JavaScript library created by Adobe, called CSInterface. This library is responsible for direct communication between extensions and host tools. A more detailed description will be provided in the later section.
Getting Started
Tools
Since you are going to write mainly HTML, JavaScript and CSS, you don't need any special editor to code. Basically, you can use the normal IDE of your liking or even go wild and code everything in notepad. I'm going to use the Visual Studio Code throughout the whole article.
Folder Structure
An extension, at the bare minimum, only requires two files to work. The first one is index.html or any other HTML
file. This file will contain the extension's UI and will be loaded by the Adobe Application at the start-up of our
extension. The second one is manifest.xml. This file stores all configuration, such as the plugin's name and the
permissions required for it to work. It is required for that file to be in the CSXS directory.
myextension
├── CSXS
│ └── manifest.xml
└── index.html
Extension Configuration
All configuration for an extension is stored in manifest.xml. This is the place where you define the name, the
permissions of our extension, and much more. Every valid extension requires this file. A minimal configuration can be
found below.
<?xml version="1.0" encoding="UTF-8"?>
<!-- 1 -->
<ExtensionManifest xmlns:xsi="http://www.w3.org/2001/XMLSchema-instance" ExtensionBundleId="com.myextension" ExtensionBundleVersion="1.0.0" Version="9.0">
   <!-- 2 -->
   <ExtensionList>
      <Extension Id="com.myextension.panel" Version="0.0.1" />
   </ExtensionList>
   <ExecutionEnvironment>
      <!-- 3 -->
      <HostList>
         <Host Name="PHSP" Version="20" />
         <Host Name="PHXS" Version="20" />
      </HostList>
      <LocaleList>
         <Locale Code="All" />
      </LocaleList>
      <RequiredRuntimeList>
         <!-- 4 -->
         <RequiredRuntime Name="CSXS" Version="9.0" />
      </RequiredRuntimeList>
   </ExecutionEnvironment>
   <DispatchInfoList>
      <Extension Id="com.myextension.panel">
         <DispatchInfo>
            <Resources>
               <!-- 5 -->
               <MainPath>./index.html</MainPath>
            </Resources>
            <UI>
               <!-- 6 -->
               <Type>Panel</Type>
               <!-- 7 -->
               <Menu>My Extension</Menu>
               <Geometry>
                  <!-- 8 -->
                  <Size>
                     <Height>500</Height>
                     <Width>350</Width>
                  </Size>
               </Geometry>
            </UI>
         </DispatchInfo>
      </Extension>
   </DispatchInfoList>
</ExtensionManifest>
The manifest defines an extension bundle, which can include multiple extensions.
ExtensionBundleIdcontains the name of the whole bundle,ExtensionListcontains a list of all included extensions. For example, if the bundle id is set tocom.myextension, the extension id should be set tocom.myextension.<name of the extension>.-
HostListdefines Adobe tools supported by the extension. Any tool not listed here will not try to load our custom extension. You can specify the application by using its unique id and version. For example, if you useIDSNcode with version19, our extension will work for InDesign in version 19 and up. At the time of writing, you can use the following 14 codes to target 13 Adobe applications. (Note that there are two keys valid for Photoshop and both are required if you want to create a custom extension for this tool):- Photoshop -
PHSP - Photoshop -
PHXS - InDesign -
IDSN - InCopy -
AICY - Illustrator -
ILST - Premiere Pro -
PPRO - Prelude -
PRLD - After Effects -
AEFT - Animate (Flash Pro) -
FLPR - Audition -
AUDT - Dreamweaver -
DRWV - Muse -
MUSE - Bridge -
KBRG - Rush -
RUSH
- Photoshop -
RequiredRuntimedefines a version of CEP for our extension to use.MainPathdefines what HTML file should be loaded initially-
Typedefines what type our new extension should be. Currently, there are 4 types:Panel- behaves like any standard panelModalDialog- opens a new extension window on top of the host app and forces the user to interact with it. The user is unable to use the hosted app unless it closes the extension window.Modeless- opens a new extension window but doesn't force the user to interact with itCustom- an invisible extension remains hidden and never becomes visible during its whole life cycle
Menudefines the name that will appear in the dropdown menu of the Adobe applicationSizedefines the default size in pixels of your extension
Enable custom extension in Photoshop
Before you start creating any custom logic for out extension, first you need to set Adobe application into debug mode. This will allow us to add our own, yet unsigned extension to Photoshop and debug it.
Mac
- Open your
terminal -
Run command
defaults write com.adobe.CSXS.X.plist PlayerDebugMode 1 && killall -u `whoami` cfprefsdCSXS.X-Xvalue depends on the version of the Adobe Application version. In this case you need to use9. Check version on the Documentation.
Windows
- Open
regedit -
Navigate to
HKEY_CURRENT_USER/Software/Adobe/CSXS.XCSXS.X-Xvalue depends on the version of the Adobe Application version. In this case you need to use9. Check version on the Documentation. - Add a new entry
PlayerDebugModeof typestringwith the value of1.
Having done that, you need to install our extension in proper directory on your machine:
- Mac -
~/Library/Application Support/Adobe/CEP/extensions/ - Win 32bit -
C:\Program Files\Common Files\Adobe\CEP\extensions\ - Win 64bit -
C:\Program Files (x86)\Common Files\Adobe\CEP\extensions\
When that step is done, you can open the desired Adobe tool and check the extension. Each Adobe tool will load any
extension found in the above folders on startup. After you run the desired tool e.g Photoshop, in the menu navigate to
Window > Extensions > <Your panel name>. After you open our custom extension, you should see a blank panel.

If nothing happens or your panel's name is not listed under Extensions, double-check if DebugMode is set and if the
extension is in the proper directory.
HTML
Creating extension UI in HTML is no different from creating a normal webpage in the browser. You can use any HTML you like and even complicated JavaScript frameworks such as React or Vue.
One important thing to be aware of is persistence. Every time user closes and opens the extension, the panel is fully
reloaded. Upon closing the panel, the extension is killed, and upon opening, an extension is initialized from scratch.
Even though the extension is killed, cookies and localstorage work normally and are not being cleared. They can be
leveraged for storing user data such as authentication tokens and so on.
For this article, you are going to use simple HTML, because you want to display static text.
<!DOCTYPE html>
<html lang="en">
<head>
<meta charset="UTF-8" />
<meta name="viewport" content="width=device-width, initial-scale=1.0" />
<title>My Extension Title</title>
</head>
<body style="background: white;">
Hello World
</body>
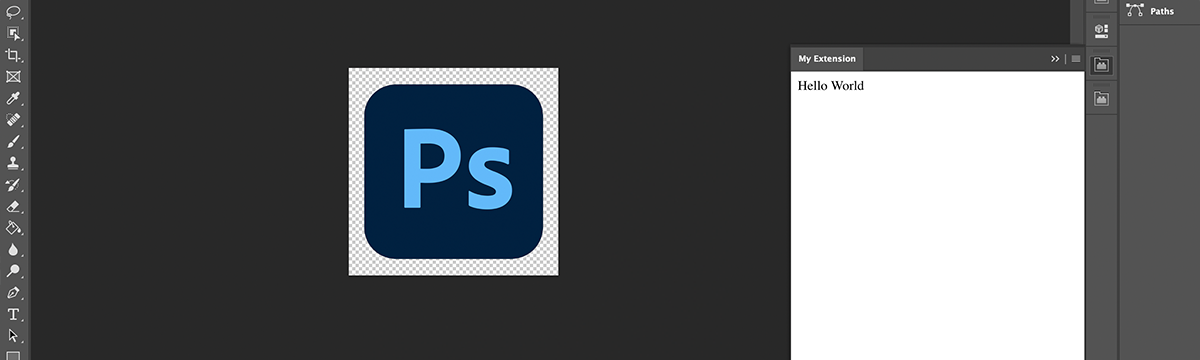
</html>After running our extension you should see happy Hello World in the Photoshop panel.

And just like this you've just created your first custom Photoshop extension. Congratulations! This extension is very simple and basic. In the next part, you will learn how to leverage the Photoshop API.
Part 2
CSInterface
Communication between extension and Adobe Tool is done by a special JavaScript library created by Adobe which is called
CSInterface. Developers can use it in
order to access the powerful API of the Host Tool such as Photoshop. This library is not imbedded into host tools so
if you need to use it you need to download it from
Github and import it to your extension.
Because it is a simple JavaScript file it can be imported using a standard script tag in HTML of our panel.
<head>
  ...
</head>
<body>
  <script src="CSInterface.js"></script>
  <script>
    var cs = new CSInterface();
    alert('App name: ' + cs.getHostEnvironment().appName);
  </script>
</body>
Once that's done, you can trigger our custom scripts, listen to events and much more. Sky is the limit.
The most important function available in CSInterface is evalScript. This function allows us to trigger a function
that has direct access to the Host Tool API. This function accepts two arguments. First is the script which needs to
be triggered, and the second is the callback function which will be triggered when our script has finished. Script is
a function that is available in the ExtendScript. This argument needs to be passed as a string. It is important to
convert all necessary arguments of our custom function to string as well before evaluating it.
var csInterface = new CSInterface();
var script = 'customFoo("' + arg + '")';

csInterface.evalScript(script, function() {
  console.log('Done');
});
Debugging
Rarely do things just work the first time around in the programming world. Because of that you need to have a way of
checking what is wrong with our code. In order to debug an extension panel in CEP, you need two things - Enabling the
custom extension in Photoshop and a .debug file. The first element was
described in the previous part of this article.
.debug file
The .debug file is a special file that tells Adobe tools that you want to attach a debugger to test our extension. It
is necessary for this file to be located at the root of our extension folder. An example of a simple extension structure
can be seen bellow.
myextension
├── CSXS
│ └── manifest.xml
├── index.html
└── .debug
The .debug file is written in XML and contains only two important elements.
<ExtensionList>
  <Extension Id="com.example.helloworld">
    <HostList>
      <Host Name="PHXS" Port="8088"/>
      <Host Name="PHSP" Port="8088"/>
    </HostList>
  </Extension>
</ExtensionList>ExtensionID- must contain the id of the extension you want to debug. This id can be found in themanifest.xmlfile. For more information please read Extension Configuration.HostList- contains a list of all host tools to which you want to attach the debugger. TheHostelement has two attributes -NameandPort. The name contains the host id, for more information please read Extension Configuration.Portcontains the port on which you will be attaching our debugger.
cefclient
Once the .debug file is created with proper configuration, you have a way to attach s debugger to the proper port.
This is the place where you need a special app created by Adobe, called cefclient. This app is basically a specialised
version of the Chromium. It can be download from
Adobe's Github page.

Once you've created the .debug file and installed cefclient, you can start debugging. For that, you are going to use
ports defined in the .debug file. In the address bar, you need to type localhost:<port>. <port> should correspond
with the value inside .debug.
If everything is fine with our extension, you should be presented with the view in which you can select which extension you want to debug. If you see an error, please make sure you have the proper host name and port typed in your debug file. Also, make sure your extension is running.

And after selecting the desired extension you have access to a full set of tools provided by Chromium. These dev tools are basically standard dev tools available in the Chrome browser or any other browser. In this place, you can validate HTML, CSS, and JavaScript code of your extension.

Node.js
Working with Node.js in CEF client is really simple and straightforward and only requires 2 lines of configuration.
In your manifest.xml under <Resources> just paste this lines:
<CEFCommandLine>
  <Parameter>--enable-nodejs</Parameter>
  <Parameter>--mixed-context</Parameter>
</CEFCommandLine>--enable-nodejs- it enables Node.js in the Chromium. Thanks to that you can use all of Node.js API without any custom configuration. This configuration can be summarized with a famous cite by Todd Howard from Bethesda Games Studio -It just works!--mixed-context- it enables working with mixed content in the Chromium so you will not get any unexpected errors
It should look like this:
...
<Resources>
  <MainPath>./index.html</MainPath>
  <CEFCommandLine>
    <Parameter>--enable-nodejs</Parameter>
    <Parameter>--mixed-context</Parameter>
  </CEFCommandLine>
</Resources>
...
Once that's done, you can use all native modules just by requiring them:
<button onclick="getfileslist()">List files</button>

<script>
  function getfileslist() {
    // Get Path to Extension directory
    var cs = new CSInterface();
    var path = cs.getSystemPath(SystemPath.EXTENSION);

    var fs = require('fs');
    var list = fs.readdirSync(path);
    alert(list.join('\n'));
  }
</script>
But you are not limited to using only native modules. You can install all modules compatible with the given Node.js version in CEP. To use them, just install them in your standard npm way. That's all. And here is an example:
First, you install our desired package using a command in the terminal:
npm install systeminformation --saveThat will create a standard node_modules directory which will contain all necessary files. Once this is done you can
use it in our extension:
<button onclick="getsysteminfo()">List files</button>

<script>
  function getsysteminfo() {
    var si = require('systeminformation');

    si.cpu(function(data) {
      console.log('CPU-Information:');
      alert(data);
    });
  }
</script>
As you see, this is not very complicated. For a real-life example I recommend you to look at RSSReader. This repository contains more advanced examples of using Node.js inside the host tool.
Events
There is a moment when creating an application that you want our code to run by itself after some specific action and
for that you use events. There is no difference here. While creating an extension, you can listen to built-in events and
even our custom ones. For listening, creating, and sending events, you're going to use CSInterface.
Event passing within extension Panel
Listening to events using CSInterface is very similar to listening to normal events in the browser.
var cs = new CSInterface();

cs.addEventListener('foo', function(e) {
  alert('event: ' + e);
});
And just like that our code will be run every time event foo is triggered. In order to trigger a custom event you need
to create a special event object using CSEvent class. Class CSEvent is declared in the CSInterface file so for
further details it’s easiest to check the source.
var cs = new CSInterface();
var event = new CSEvent('foo');
event.data = 'Hello world!';

cs.dispatchEvent(event);
Event passing from Panel to Host Tool
To communicate between JavaScript and ExtendScript, you once again use CSInterface. This time, however, you need
to use the PlugPlugExternalObject library as well. PlugPlugExternalObject allows your ExtendScript code to create
and dispatch CEP events. This library should be integrated into each of the modern Adobe tools but just in case you
are going to use condition here.
Listening for the event sent from ExtendScript does not differ from listening to normal events in the Panel. Once
again you are going to use addEventListener. This time you are going to listen for a custom event -
cep.extendscript.event.message.
var csInterface = new CSInterface();

csInterface.addEventListener('cep.extendscript.event.message', function() {
  console.log(event.data);
});
Once that's done, you can navigate to ExtendScript to create a trigger for our custom event. Before you dispatch any
event you need to make sure PlugPlugExternalObject is available and it is loaded. This is done once, preferably at the
start of your script.
try {
  xlib = new ExternalObject('lib:PlugPlugExternalObject');
} catch (e) {
  alert(e);
}
Once PlugPlugExternalObject you can dispatch events. You can use a simple function to simplify this process and make
sure to check if needed library is loaded.
function dispatchCepEvent(in_eventType, in_message) {
  if (xlib) {
    var eventObj = new CSXSEvent();
    eventObj.type = in_eventType;
    eventObj.data = in_message;
    eventObj.dispatch();
  }
}

dispatchCepEvent('cep.extendscript.event.message', 'Update the UI');
Listening to Host Tools events
In order to listen to Host Tool events, you need two things - an event id, and an ExtendScript file which needs to be run when the event is triggered.
The Event Id is a 4 letter string, which can be found in the documentation. In this case, you are going to use
Adobe Photoshop Documentation
because our extension needs to work in Photoshop. So, for example, if you want to run our code every time the user saves
the file in the Photoshop, you need to use the save event. BUT some event codes consist of letters and space. For
example, the open event's event id is Opn. The space after n is very important so make sure you use the proper
event id.
Once you have event id, you need to create a new ExtendScript file. This file will be run every time the event is
triggered. Just like a callback. To get a file you need to use the File class. This class accepts the path to a file
and returns a reference to it. The path can be hardcoded to, for example, C:\\SaveCallback.jsx but then the user would
need to download your script to the proper directory on their drive. A much better solution is to use app.path. This
will return the path to an extension on the user drive.
var eventFile = new File(app.path + '/jsx/save.jsx');Host Tool events need to be attached in ExtendScript to notifiers. This class has a simple add function that accepts an event id and a callback file.
var eventFile = new File(app.path + '/jsx/save.jsx');
app.notifiers.add('save', eventFile);
Now, let's take a look at save.jsx. All you need to do to run your custom script and make sure it will not break is
use try and catch. Just like this:
try {
  alert('file saves');
} catch (e) {
  alert(e);
}
And that's all. If you want you can trigger custom events in this try in the way it was presented in the previous
section.
Packaging and Distribution
In the previous section, you learned how to create your desired extension, but now, after all of the development processes is done you need to share your creation with the world.
Packaging
Adobe tool extensions are packaged as .zxp files. They are basically a .zip file with signing details. Before you
distribute our extension, you need to sign it. This means that you need to create a special certificate and stamp it on
our extension in order for Adobe tool to see our package as safe to run.
Currently, there are 3 ways of signing an extension:
In this article, I'm going to use CC Extensions Signing Toolkit because it works and does not require any special
account at Adobe site. It is command-line tool and will allow us to create a certificate and sign our extension.
First, you need to create a self-signed certificate. For that you are going to run CC Extensions Signing Toolkit in
our terminal with property -selfSignedCert. A certificate requires some data such as - country, region
oranization username, userpassword, outputFile. Output file will determine the name of our newly created
certificate and it needs to have a .p12 extension. For all available options, you can refer to official
Adobe Extension SDK documentation PDF.
# ZXPSignCmd -selfSignedCert country region organization username userpassword outputFile
./ZXPSignCmd -selfSignedCert PL Poland Cognifide KacperRogowski password123 myCert.p12
After that's done, the only thing remaining is to sign our extension. For that, once again you're using the
CC Extensions Signing Toolkit. This time you need to use the -sign property. This requires options such as -
sourceFolder, outputFile, certificate, password. After running this command, myExtension.zxp should be
created.
# ZXPSignCmd -sign sourceFolder outputFile certificate password
./ZXPSignCmd -sign "../extensionSourceFolder" myExtension.zxp myCert.p12 password123
Distribution
After creating the .zxp archive, the last remaining step is to share it with the users. If your extension is intended
just for your team or company, you can just share this file with them and it is done. Users can install your new
extension with a command-line tool which can be found in
Adobe Documentation or with the small
app ZXPInstaller.
For widespread distribution, it is recommended to share your creation using Adobe’s Add-ons site. Creative Cloud service
operates an extension repository called Adobe Add-ons. Extensions can be browsed,
installed, and managed from the browser without any extra steps or knowledge. The installation process is done behind
the scenes so the user only needs to click Install and wait for the installation to finish. Free extensions can be
self-signed so there is no extra cost involved. The site supports also paid and subscription models, but you’ll need a
purchased proper certificate for those.
Each extension is reviewed and must meet approval guidelines to become available for users to use. This process may take around 10 business days so you need to be patient.
To get started with distributing extension using Adobe Add-ons site, go to
Adobe Exchange Program and press
Join the Exchange Program. After that, press Create Listing. You will be navigated to the wizard so you just need to
follow the steps and input all necessary data.
Summary
I hope you find this article helpful on your path to becoming a master in using Adobe tools. Of course, the content of this article covers only a fraction of the things made possible by ExtendScript and CEP and I highly recommend you read the official documentation. Below you can find some useful links in which you can find any help or information when you're stuck during your development journey. Good Luck!
- Adobe CEP Github
- Adobe Add-ons
- Unofficial Photoshop Scripting & Extension Reference
- Adobe PhotoShop Scripting Documentation
- Installation of ZXP usuing command line
- Extension Builder 3
- Adobe Labs
- ZXPInstaller
- CEF
- CSInterface
- Adobe Creative Cloud Developer Brand Guide
- Adobe Exchange Program
- Adobe Tools API
