This short tutorial will show you how easy is to add new widget to CogBoard.
Let's assume that we are working in a project with a tight schedule, the dev team is stressed and tension is getting higher with each passing day. The team uses CogBoard on a TV in the office. The tool gives them a clear view of the project's status. They can also see that various API endpoints, which their application relies on, are working as expected. They are quickly informed when something goes wrong so they can react quickly but still pressure is high and deadline is set. What is the best solution? CATS !!! Pictures of cute cats to be precise, everybody loves those furry, meowy creatures.
Let's implement a new widget that will show random cat pictures to our dev team and help them relax :)
Before we start
We need to install CogBoard on our local machine. Thankfully installation is easy and well documented. You will just need JDK, Docker, and Git.
Follow installation guide HERE.
After installation check if CogBoard is running on localhost.
DISCLOSURE
Bear in mind that this is just a basic tutorial so I will keep the code very simple.Widget Implementation
Our widget will have backend and frontend part. Backend will call http://aws.random.cat/meow API endpoint to get cat picture URLs. Frontend will be responsible for displaying those pictures. This could be also achieved without backend integration but let's assume that aws.random.cat/meow API is only available on our internal network.
Without further ado let's start implementation.
Widget Backend Implementation
For our backend development we are using Kotlin language.
We will start by adding a new class under com.cognifide.cogboard.widget.type package. The New class should extend
AsyncWidget as this approach will give you async behavior and execution in a schedule for free.
class CatsWidget(vertx: Vertx, config: JsonObject) : AsyncWidget(vertx, config) {

    override fun updateState() {
        TODO("not implemented")
    }

    override fun handleResponse(responseBody: JsonObject) {
        TODO("not implemented")
    }
}
Now all we need to do is to implement two methods:
updateState()handleResponse(responseBody: JsonObject)
updateState() - method will be executed in schedule. We will use it to preform third party API call. In our case we
will call aws.random.cat/meow endpoint. We can use a ready to use Http Client registered on
event bus by simply calling httpGet method. The
call will be made in the background and as soon as the response is received the handleResponse method will be called.
override fun updateState() {
    httpGet(url = "http://aws.random.cat/meow")
}
handleResponse(responseBody) - method will be executed when call to aws.random.cat endpoint is done. responseBody
contains the cat picture URL. Lastly, we will use send(...) method to update our widget's frontend part. CogBoard uses
web-socket for communication so all opened CogBoards will be notified that the widget content has changed. By convention
JsonObject passed to send method should have content property also of type JsonObject. All properties from
content will be available to use in widget's frontend part. All other required properties will added inside send
method for us.
override fun handleResponse(responseBody: JsonObject) {
    val imageUrl = responseBody.getString("file") // extract image URL
    val content = JsonObject().put("imageUrl", imageUrl) // create new content with one property

    send(content) // send state to all subscribers
}
As you can see implementation of backend part is focused on actual things specific to a widget. We need to focus only on preparing URL to 3rd party endpoint and then on parsing the results. Those two methods are non-blocking so they can do time consuming tasks.
Widget Backend Registration
Last thing that you need to do in backend is to register newly added widget so we can use it. Just add a line to the
com.cognifide.cogboard.widget.WidgetIndex class:
CatsWidget::class.java.simpleName -> CatsWidget(vertx, config)Widget Frontend Implementation
For our frontend development we are using React JSX (JavaScript syntax extension).
We will start by adding new React component to our widgets under: cogboard-webapp/src/components/widgets/types. Let's
keep it really simple.
// basic component structure
const CatsWidget = () => {
  return (
    // TODO: renderer here
  );
};

export default CatsWidget;
Our body of CatsWidget will be just a styled img tag. In more complicated widgets we should use existing React
components from Material-UI
and imports:
import React from 'react';
import { string } from 'prop-types';
import styled from '@emotion/styled/macro';
and some style:
const StyledDiv = styled.div`
  height: 100%;
  position: relative;
`;

const StyledImg = styled.img`
  position: absolute;
  width: 100%;
  height: 100%;
  top: 0;
  display: block;
  object-fit: cover;
  object-position: center;
`;
implement renderer:
const CatsWidget = ({ imageUrl }) => {
  // unwrapping imageUrl from content node
  return (
    <StyledDiv>
      <StyledImg alt="Cute Kitty" src={imageUrl} />
    </StyledDiv>
  );
};
add validation:
CatsWidget.propTypes = {
  imageUrl: string.isRequired,
};
Widget Frontend Registration
Last thing that we need to do is to register newly added widget so we can configure and use it. We do this in
cogboard-webapp/src/components/widgets/index.js file:
import CatsWidget from './types/CatsWidget';

 ...

CatsWidget: { // ! by convention this key should be the same as in backend registration
    name: 'Cute Cats',
    component: CatsWidget,
    dialogFields: [
      'SchedulePeriod',
    ],
    showUpdateTime: false,
    validationConstraints: {
      SchedulePeriod: { min: 3 }
    }
  }
General Tab will be added for us automatically so we don't need to think about basic properties like Title,
Columns, Rows... For our Custom Tab we are using one additional predefined dialog field SchedulePeriod - this
will handle scheduling when widget gets updated with new cat picture. We can choose from many predefined dialog fields
simply by using their name in dialogFields array. Dialog fields are defined in
cogboard-webapp/src/components/widgets/dialogFields/index.js
Result
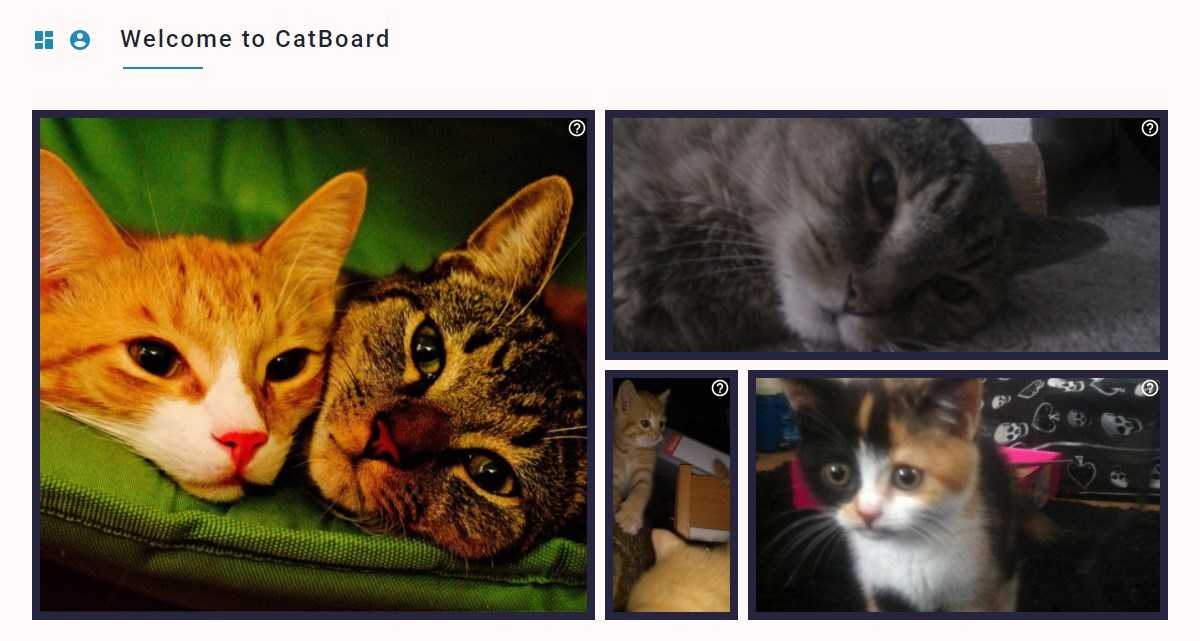
We can now enjoy Cute Cats on our Dashboard

For more details read CogBoard's Wiki Pages, you can also look for examples in the codebase. Code of this tutorial is available on branch.
Summary
As you can see, adding a basic Widget is simple. We've provided abstractions so many common things are done for you. I hope this small tutorial will engage you to use or even to contribute to CogBoard. You are all welcome
In next tutorial I will focus on writing unit and automated tests.
Hero image by Marko Blažević, opens in a new window

